Project Groups Integration
Introduction
Sensei Project Group Integration provides customers with the ability to utilise Office 365 Group Sites in place of Project Sites that are usually provisioned as sub-webs in the Project Online Site collection.
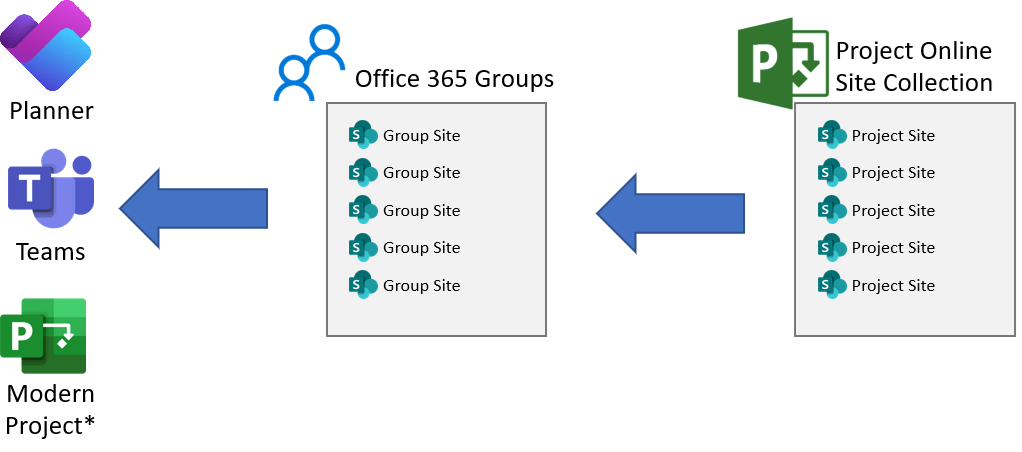
Using Office 365 Group Sites provides advantages over Project Sites:
- Modern Site Experience
- Collaborate with a wider audience. Group Sites can be easily shared with other internal users and External Guests from outside your organisation.
- Avoid the SharePoint 2000 web site collection limitation
- Teams integration
- Planner integration
- Future integration with Modern Project*
Use
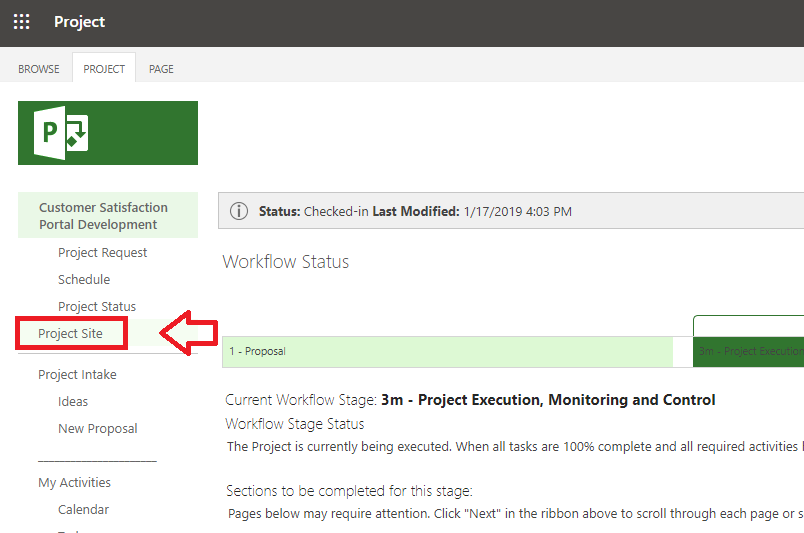
Once activated and configured, clicking on the Project Site link on a PDP will cause an O365 Group to be created:
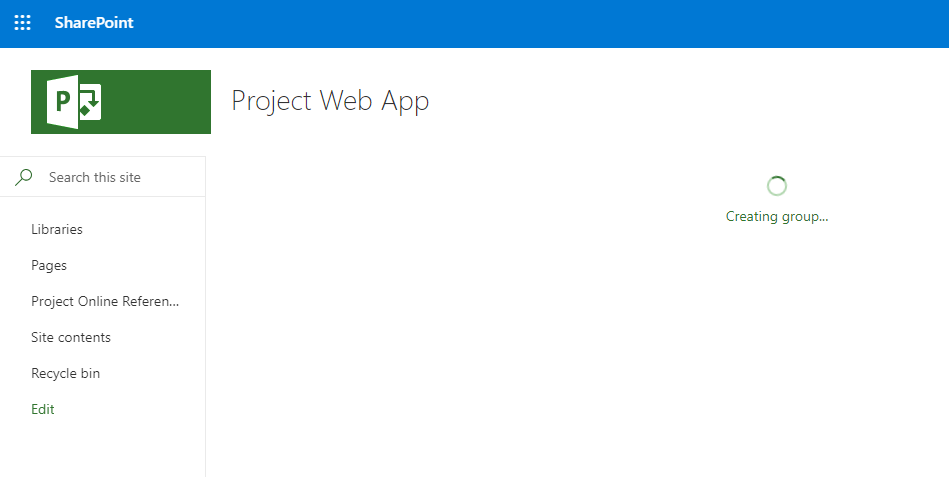
If the O365 Group Site Does not yet exist, it will be created:
When the group creation completes, or the group had been previously created, you will be navigated to the O365 Group Site:
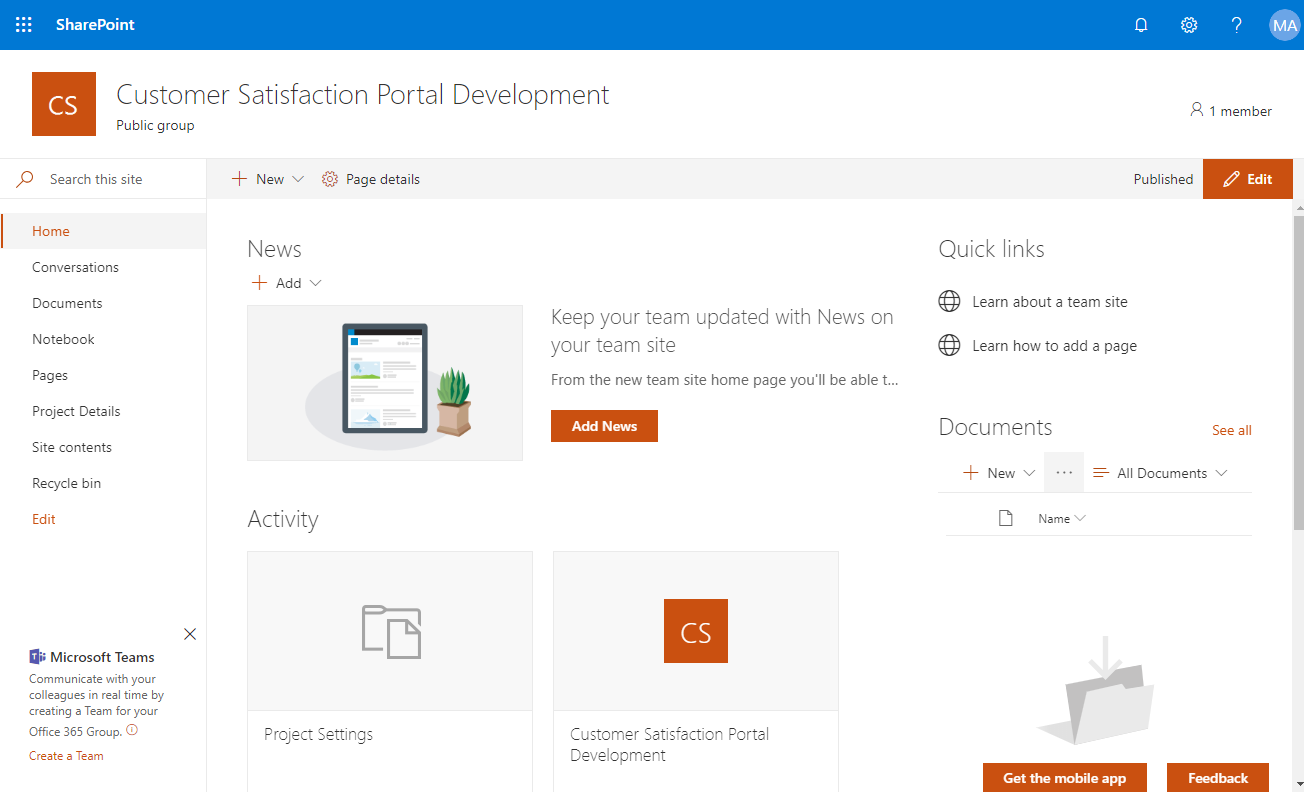
From here is is very easy to create a Microsoft Team by selecting the link in the bottom left:

Deployment
The Sensei Project Groups Integration component is packaged as a SharePoint Framework Webpart. This package is intended to be deployed via the Tenant or Site Collection App Catalog in your O365 Tenant.
1. App Package Deployment
If you are an Empower PPM customer and have nominated Option A or Option B in the technical readiness guide, this App package deployment will be performed by your Sensei Consultant and you can skip to the next step.
If you not are an Empower PPM customer, then download the following App Package file by clicking below:
This file must be added to your Tenant or Site Collection App Catalog:
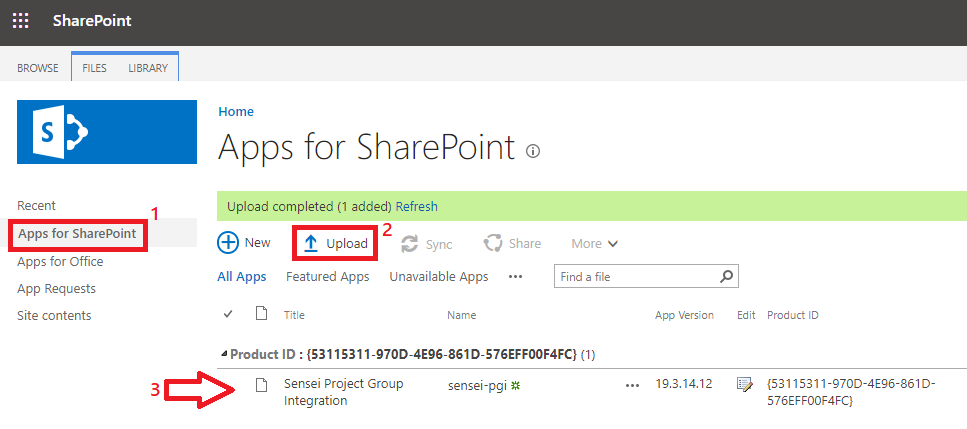
During this process a trust dialog must be accepted that allows the addin to be deployed to the PWA site:
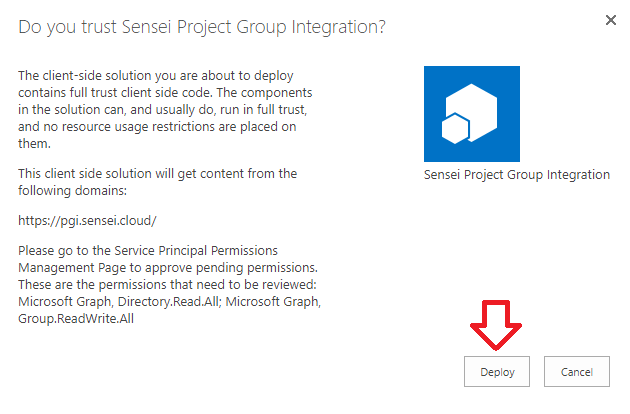
2. Accept API Permission Requests
The PGI component is responsible for creating O365 groups for each project to use as collaboration spaces. It utilises the Microsoft Graph to do this.
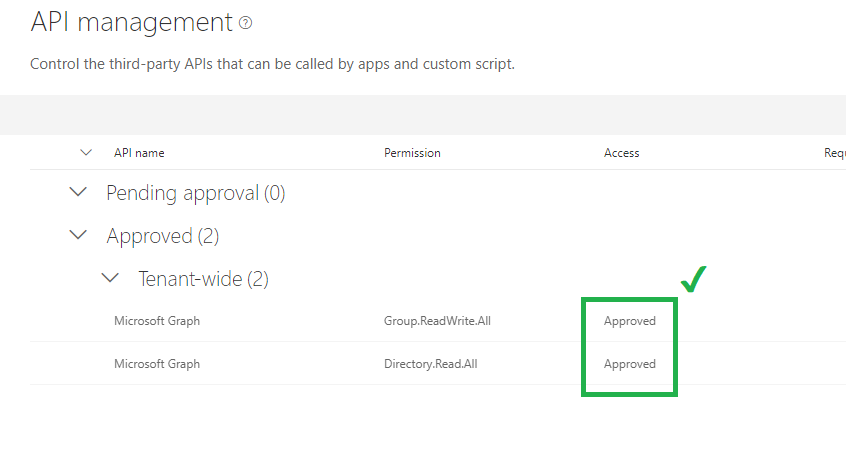
In the modern SharePoint Admin Center click on API Management and approve the pending API requests for:
- Directory.Read.All: This is necessary to read user information when assigning Members and Owners of Groups.
- Group.ReadWrite.All: This is necessary to search for existing Groups and allow the creation of O365 groups.
The security permissions are “Delegated” so the access is does not confer on users any additional permissions to users that are using the App. Hence if individual users are unable to create groups, the App will also not be able to create groups.
The security risk to be considered here is that all the SPFX Apps in the tenant App catalog will get this ability – so the governance responsibility is to regularly curate the contents of your App catalog to ensure you trust the source of the applications that are loaded.
Unfortunately due to the cross-site nature of the application it was not possible to used a more contained scope for the permission request.
The exact API’s used by the application are:
- Create Group for the project
- List Groups and find a Group for a project
- Get Group Drive
- Create Team for a project group
- Get Channels for a Team
- Add a Tab to Channel
Please perform the following:
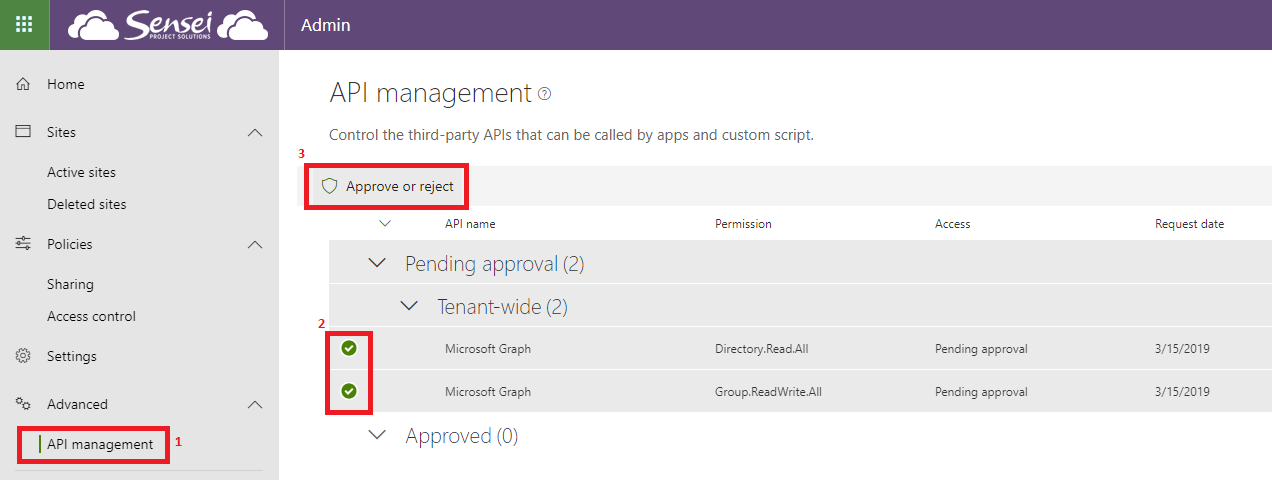
During the process:
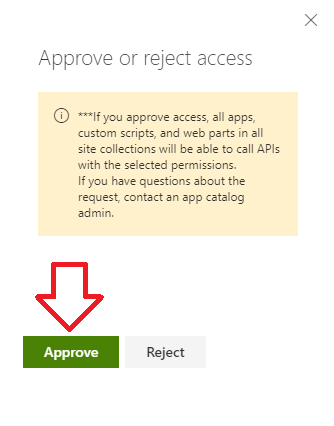
Once completed:
3. Activate Site Pages Feature
If you are an Empower PPM customer this step will be done for you - skip to the next step.
Important
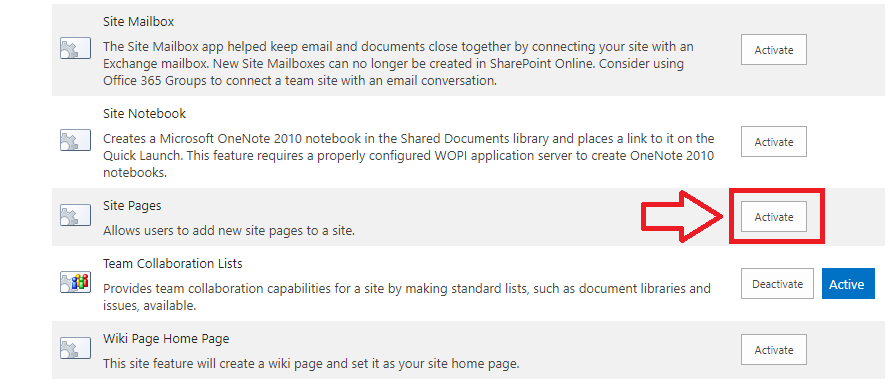
The Site Pages feature on the PWA Site collection must be activated prior to deployment of the Project Group Integration App. You cannot activate the feature afterward as it will produce an error. If you find yourself in this senario please contact Sensei Customer Care to rectify the situation.
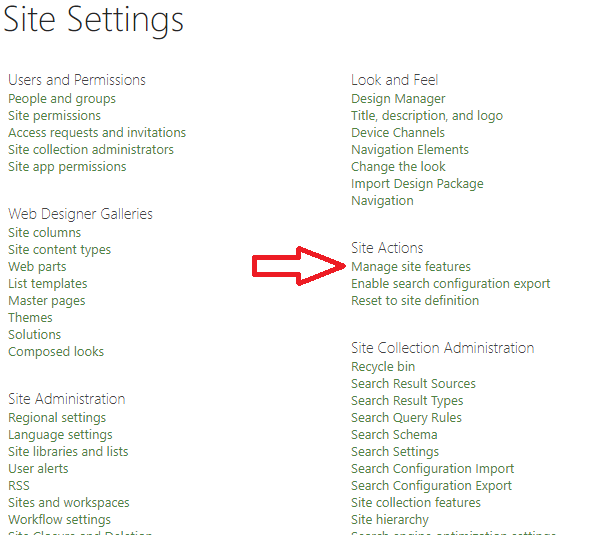
- Select Site Settings -> Manage Site Features
- Activate the Site Pages Feature
Important
PGI also requires the Site Assets folder to be present in the site. If this is missing, activate the Wiki Pages site feature.
4. Add the App
- Navigate to Site Contents -> New -> App:
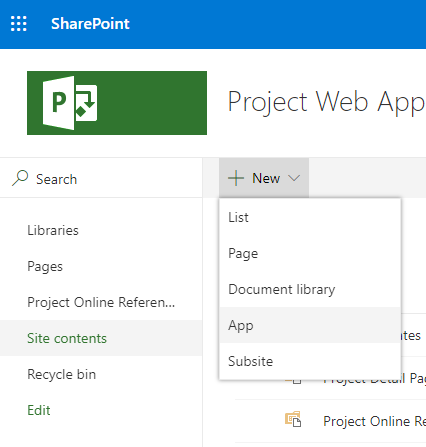
- Select the Sensei Project Group Integration App
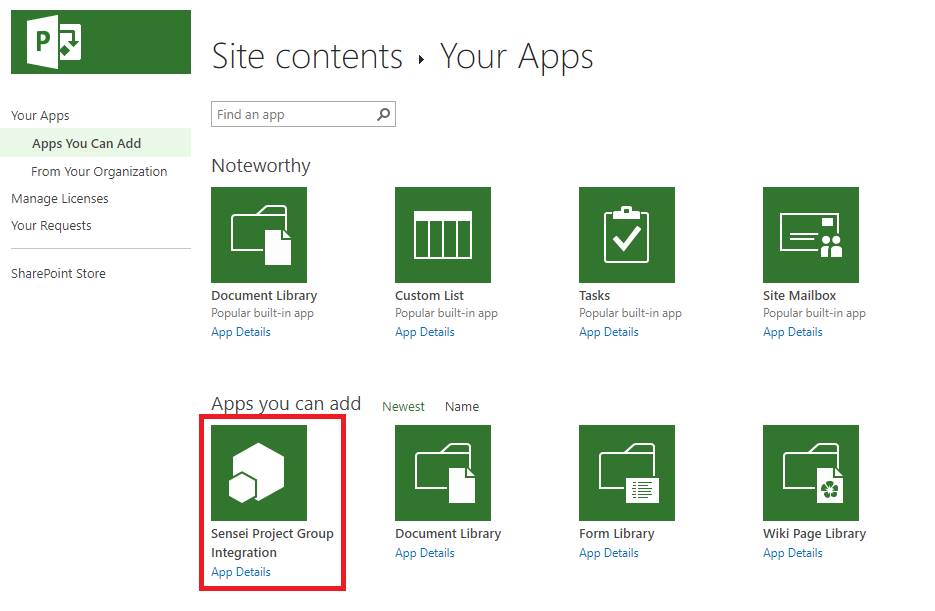
5. PWA Settings Link
If you are an Empower PPM customer, this step will be done for you - skip to the next step.
Navigate to the Site Pages Library and click on the GroupIntegration.aspx page:
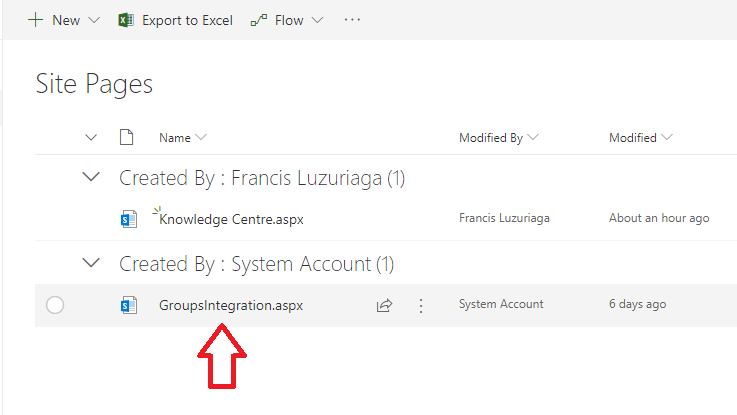
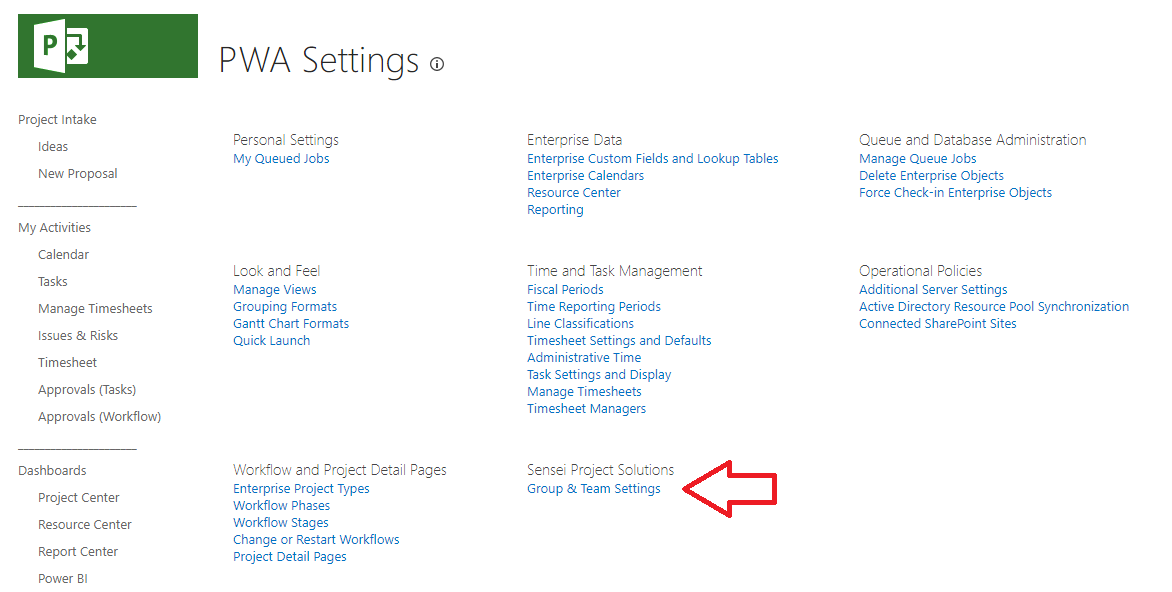
After this navigation, the Group & Team Settings link will be available on the PWA Settings page.
Configuration
After selecting the Group & Team Settings link from the PWA Settings page, the following settings are available:
Groups Integration

Enable this toggle to change the behaviour of the Project Site link in the PDP pages to direct users to the corresponding Group Site for the project. In the case where a corresponding O365 Group isn't registered, it will be created using the URL pattern.
Note
This option is required to be enabled to enable any other feature functionality.
Important
To enable PGI the Site Assets folder must be present. If this is missing, activate the Wiki Pages site feature in Site Settings.
Name Template

The Name Template field will be used to generate the Name of the Group (and Team if enabled.) The default behaviour is to default to {Name} which will provide the Group/Team with the same name as the project, however that can be configured to add additional fields, prefixes and suffixes. Any valid Project Attribute or Project-level Custom Field value can be used in the Name Template by enclosing them in braces { } as shown in the example which adds the {Program} field to the end of the name.
URL Template

The URL Template pattern will be used when creating new O365 group sites. When an O365 Group doesn't exist for the current project (via the Project Group Mapping List), one will be created using the URL Template. The built-in field ProjectIdentifier is commonly used to suffix the URL of the resulting O365 Group Site, but any valid Project Attribute or Project-level Custom Field value can be used in the URL Template by enclosing them in braces { }. Experiment until you see the appropriate URL in the Example Group Url box.
Caution
The pattern must produce a unique URL for each project, otherwise group creation will fail. Inclusion of {ProjectIdentifier} or {Id} is recommended
Note
In order for Project Online Sync for Word to function correctly, the URL of the Group Site will always be a super-set of the PWA URL: <PWA URL>-<Url Template>
Group Visibility

Groups are created as Public Groups by default. This has several distinct advantages:
- Collaboration content created within the group can be found by search. Sensitive projects can be managed by exception by switching to Private at any time.
- Public visibility of the group prevents duplicate groups from being created.
- Team members can self-manage their membership to the group, and do not need to request access.
In the case where creating Groups Private is more important than the above advantages then change the setting to Private.
Note
In Private mode, Groups will be initially created as being owned by the creator of the group. This owner must manually add other team members who require collaboration (it may not be desirable for all all team members to have access to the Group) and manage the membership of the group over the lifecycle of the project.
Integration Mode

The Integration mode controls the behaviour of the Project Site link available on Project Detail Pages (PDP's). The following behaviours are available:
- Hybrid: (default) In this mode, if the Project currently already has a classic Project Site (sub-web of the PWA site) then the Project Site link behaviour will remain unchanged. If the Project doesn't currently have a classic Project Site, then an Office 365 group will be created. This allows for hybrid mode of operation where collaboration of both types can occur in the same site collection.
- Always Group: In this mode, Office 365 Groups are used for Project collaboration in preference over classic Project Sites (sub-webs of PWA). Classic Project Sites can exist in the PWA site collection, but the Project Site link will direct the user to the Office 365 Group.
Note
To disable all custom Project Site link behaviour, deactivate the main Groups Integration toggle.
Classification
For customers who have enabled Office 365 Group Classification features in their tenant, the Group Classification option will appear. If you don't see this option, the Classification feature has not been enabled by your tenant administrator.

The Group Classification setting controls the default classification setting used to create all new Office 365 Groups. The classification can subsequently be changed by the group owner to suit the individual project profile.
Templating Actions
The templating actions section contains actions that will be executed after the initial Office 365 group is created. The user will not be asked to wait for the Templating Actions to be completed before they can begin using the O365 Group.
Permissions
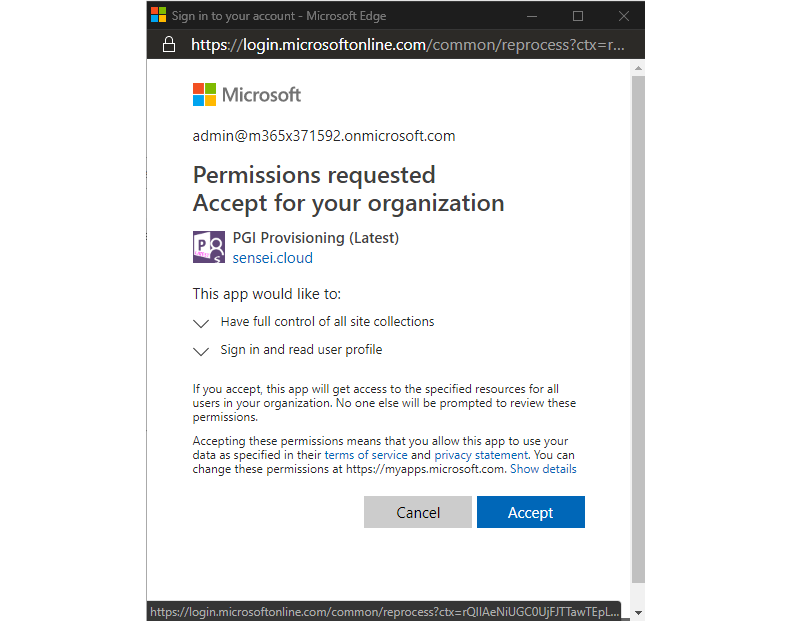
As the templating actions are performed non-interactively a separate grant of permissions is necessary to facilitate the Sensei components taking action without the presence of a user. In addition, the Service Principal will not by default have access to the O365 Group Site to apply changes, so it needs administrative access.
On initial enabling of the Templating Actions feature, the permissions will be checked to ascertain if granting permissions is necessary.

If it is detected that the Service Principal doesn't currently have the required permissions, the Grant Permissions Required button will be presented.

Pressing the Grant Permissions Required button will open a popup window asking for permissions to be granted.
Note
An Office 365 Administrator will be required to consent to the required permissions.
Once accepted, the permissions will display as OK.

PnP Templates
The Patterns and Practices (PnP) community has produced a popular templating technique for provisioning consistent functionality across multiple sites. The solution utilises this templating standard to capture the custom elements (e.g. lists, libraries, branding) and apply them to new O365 Group sites.
A PnP Template can be generated using powershell commands from an existing site resulting in either an XML file or a PNP file.

Once generated and customised, use the Manage link to upload your template file. Check the box against the template file to have the template applied to new O365 group sites.
Warning
Each individual PnP template file must take no longer than 10 minutes (ideally no longer than 5 minutes) to apply to the O365. If necessary restructure your template instructions into multiple files and they will be applied in alphabetical order.
Note
Remember to press save at the bottom of this page to persist your changes.
PnP Parameters
When using the PnP templating system, parameters will be passed to the template to allow the dynamic configuration of the site. The parameters can be consumed in the template file using the following syntax:
{parameter:ParameterName}
Some of these parameters are directly settable like the Hub and Site Design:

Other parameters passed to the template are:
| Parameter Name | Example Value |
|---|---|
| EnterpriseProjectTypeId | bf51a257-b447-e711-80ce-00155d3c8414 |
| EnterpriseProjectTypeName | New Product Development |
| ProjectUid | 614f59ae-3779-e711-80c7-aaf82c4c4dd0 |
| ProjectName | Biothermal Ear Warming System |
| ProjectIdentifier | NPD-0013 |
| ProjectType | 0 |
| SourceSiteUrl | https://contoso.sharepoint.com/sites/pwa |
| TargetSiteUrl | https://contoso.sharepoint.com/sites/pwa-NPD-0013 |
| TenantId | f3eee827-1279-45ba-b071-daf8cc1f6cde |
| TeamId | 0eefc26b-9d52-e711-80ce-00155d3cbe1c |
| TeamUrl | https://teams.microsoft.com/l/team ..... |
| SiteDesignId | 5238c46c-1fac-49b7-9ba1-c472e832f49d |
| SiteHubId | 8eeb8df2-46ea-4cd8-ab49-849c1e22df5d |
NoScript Override

In order to perform some more advanced customisations with the PnP Provisioning engine it will be necessary to temporarily disable the NoScript flag (also known as the DenyAddAndCustomizePages site setting).
When this override flag is enable, the provisioning engine will disable the NoScript flag on the site collection for the duration of the templating session and then re-enable it.
Teams Integration
A Microsoft Team is an add-on that can be aplied to an O365 Group. After the O365 Group Site has been created, the user can manually create the Team by clicking the link in the bottom left of the O365 Group Site.

To automate this task, enable the Teams Integration toggle.
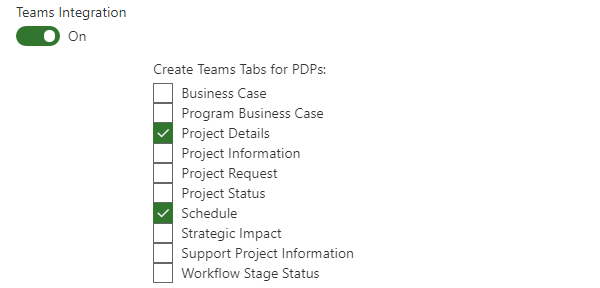
In addition to having the Microsoft Team be created, additional Tabs can be added to the Team that allow access to Project Detail Pages (PDPs) for the project. Check the box next to any additional tabs to be created for related Project PDP's.
Webhook
In some instances, the above customisation facilities may not cover every eventuality - and need for custom code may arise. The URL specified in the Webhook URL will be called at the completion of provisioning process - either from the browser of the user (if no templating actions specified) or from a Cloud service in the case where background provisioning processes are necessary.
Possible use cases:
- Connect to Flow HTTP trigger or Logic Apps trigger:
- Send alerts
- Add additional team members
- Enable further teams tabs
- Make additional EPT specific customisations.
Troubleshooting
Governance Policy Settings
Azure AD Premium allows Office 365 Administrators to disable/limit the creation of Office 365 Groups. Groups are the bedrock of many Office 365 services, and disabling them also disables features in Teams, Planner, Outlook, Project Roadmap, Power BI, Shifts and more.
The restriction is enabled by a Tenant Administrator utilising PowerShell to disable Group creation except for a Trusted Security Group of users who are allowed to create groups.
Project Group Integration will honour these settings when in place and the following message will be displayed:

Tenant admin has not enabled Unified Group creation.
OR like the following
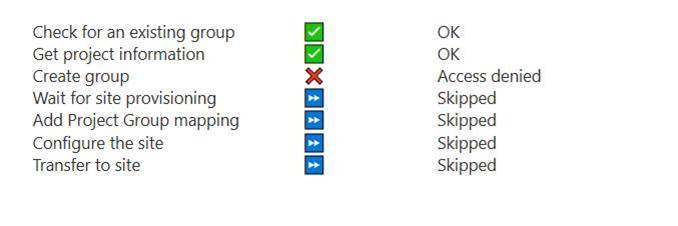
Possible solutions are:
- Ask a tenant level administrator, or member of the Trusted Security Group to click on the Project Site link for them and then make the requesting user a Member or Owner of the Group.
- Have the Office 365 administrator add the Project User(s) to the Trusted Security Group so that the requesting user can create groups.
Teams Licencing
In order to be able to use the Teams integraiton features, the individual end-users must also be licensed and authorised to use Teams.
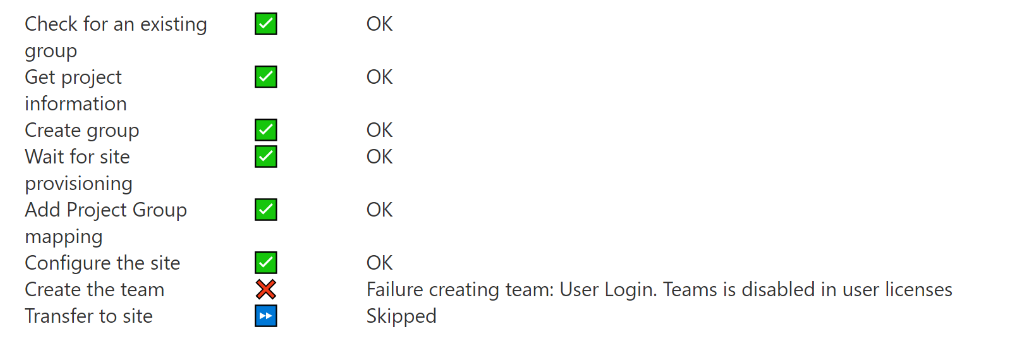
Teams is disabled in user licensing
The above can occur if the user doesn't have appropriate licensing or permissions to use the Microsoft Teams functionality.
- Double check the licenses granted to the user in the O365 Administrative portal.
- Double check settings in the Teams administrative portal.
Group Ownership Limits
Each Office 365 user is limited to creating/owning 250 O365 Groups. When this occurs the following message is displayed:
The directory object quota limit for the Principal has been exceeded.

We are currently unaware of any method to increase this limit - however the workaround is to utilise a different user to create the groups, or remove the ownership of O365 groups from the current user experiencing the issue.
Provisioning Log
To monitor the progress of the Templating Actions being applied to O365 Group Sites you can view the Provisioning Log list that will be present after provisioning has started.
This is accessible from the PWA site via ⚙->Site Content->Provisioning Log

This log will show the activity taken by the provisioning engine, and errors or issues with applying the templates will be reported here.
To be alerted in the case of a provisioning failure, use Flow to subscribe to this list and send an alert when the Level field is Error
Regenerating a Site
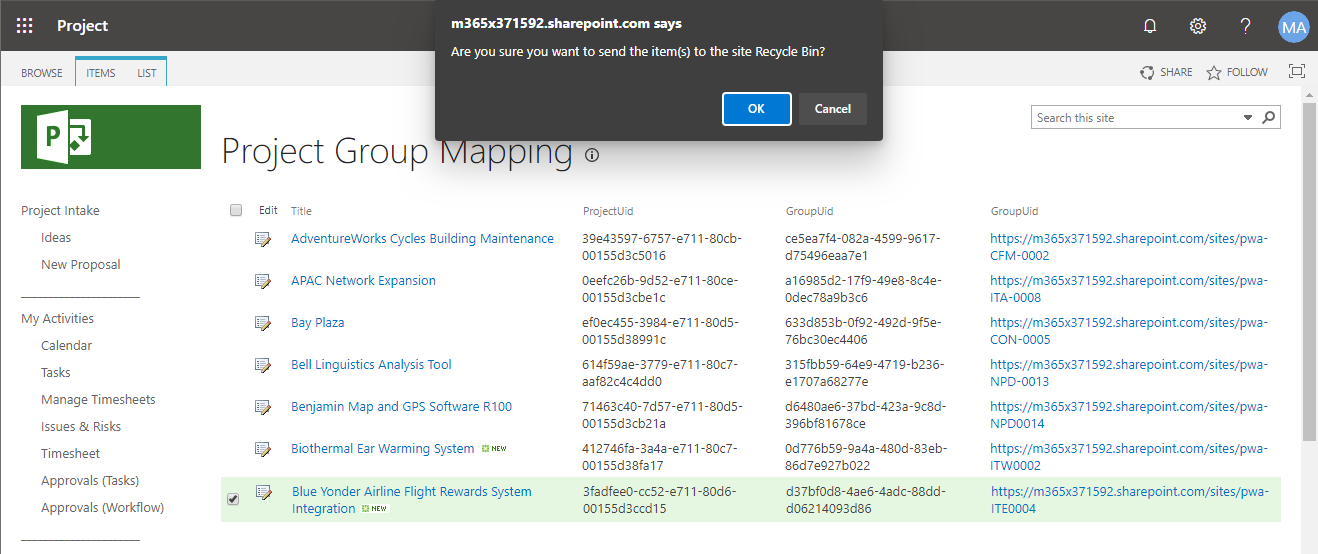
You can delete an O365 Group/Team and then re-provision the site.
Caution
This process will delete all the data in the Group, Site & Team.
- Go to the O365 Group Site homepage and ⚙ -> Site Information -> Delete Site, and accept the warning.
- Go to the
⚙ -> Site Content -> Project Group Mapping - Delete the site from the Mapping List
- Navigate to the
Project Sitelink from the relevant Project PDP to re-create the Group/Site/Team.
Re-applying Templates to existing sites
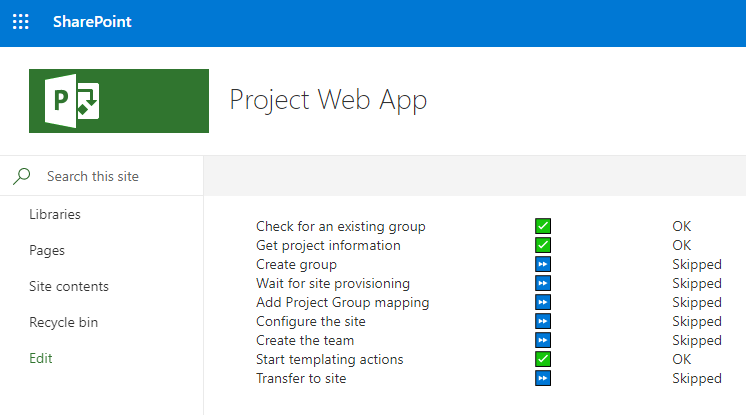
The templating actions can be re-run for an existing site by using a specially formed URL. Use a URL in this format:
https://contoso.sharepoint.com/sites/pwa/SitePages/GroupsIntegration.aspx?projuid=<ProjectUID
  >&debug=Check for an existing group,Get project information,Start templating
  actions</ProjectUID
>
Internet Explorer 11
Warning
PGI Teams features are unsupported with IE 11 after November 30th 2020. PGI is unsupported with IE 11 after August 17th 2021.
Microsoft Edge Legacy
Warning
PGI is unsupported with IE 11 after March 9th 2021.
When using Microsoft Edge Legacy (non-Chromium based) in some scenarios Group creation will fail and the user will be prompted for further Authentication via banner:
To view the information on this page you need verify your identity. Click to provide additional credentials
Unfortunately clicking on the banner link will take the use through a re-authentication process that does not solve the issue.

This has been observed in the following scenario:
- Using Edge
- Using Windows 10
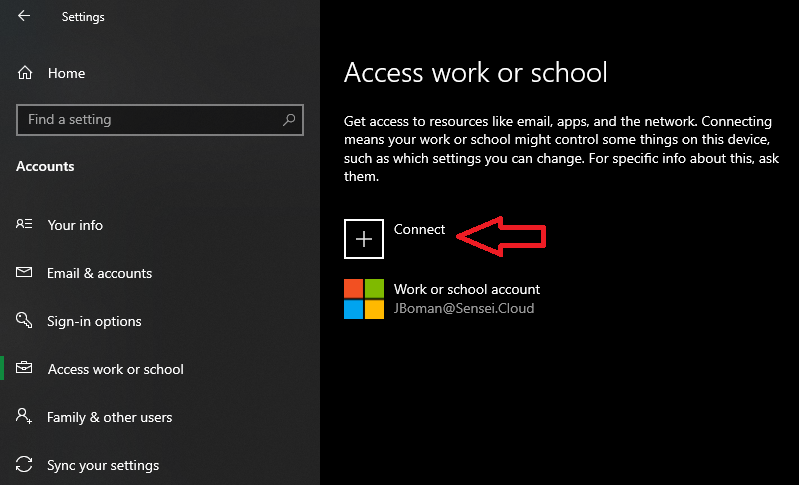
- The credentials used for SharePoint currently logged in user is NOT in the Windows Settings Account list
To solve the issue, add the account used to log into SharePoint into the Work/School section of the Windows 10 Settings:
Updating
From time to time an update may be needed to the Project Group Integration App catalog package. This is indicated by the display of an update link in the top-right corner of the screen.

Note
This update is not usually critical to the operation of the webpart, and is aimed at keeping the underlying SharePoint Framework libraries up-to-date, however if you are encountering any abnormal behaviour, please apply the update before logging a support ticket.
Follow these steps to apply the update:
- Download a copy of the latest version of the PGI package from here:
 Download sensei-pgi.sppkg
 - Upload this file into your App catalog overwriting the old version:

- Press 'Deploy'

- If the file has a small green mark on it, please check-in the file from the Ellipses->Advanced menu.
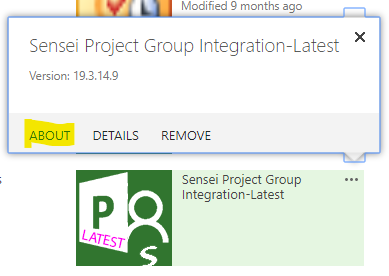
- In the PWA Site collection, navigate to ⚙->Site Contents and choose the About link.
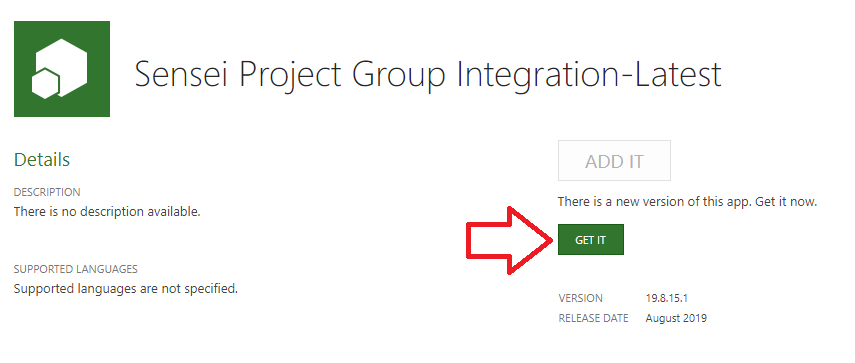
- Select the Get it button to apply the update.
Maintaining custom scripts in PWA
There are scenarios where features in legacy products run into issues caused by a new security setting introduced by Microsoft that prevents javascript from running in a SharePoint site.
You can manually change this setting from your SharePoint Administrative Portal -> Sites -> Active Sites -> Site -> Settings:
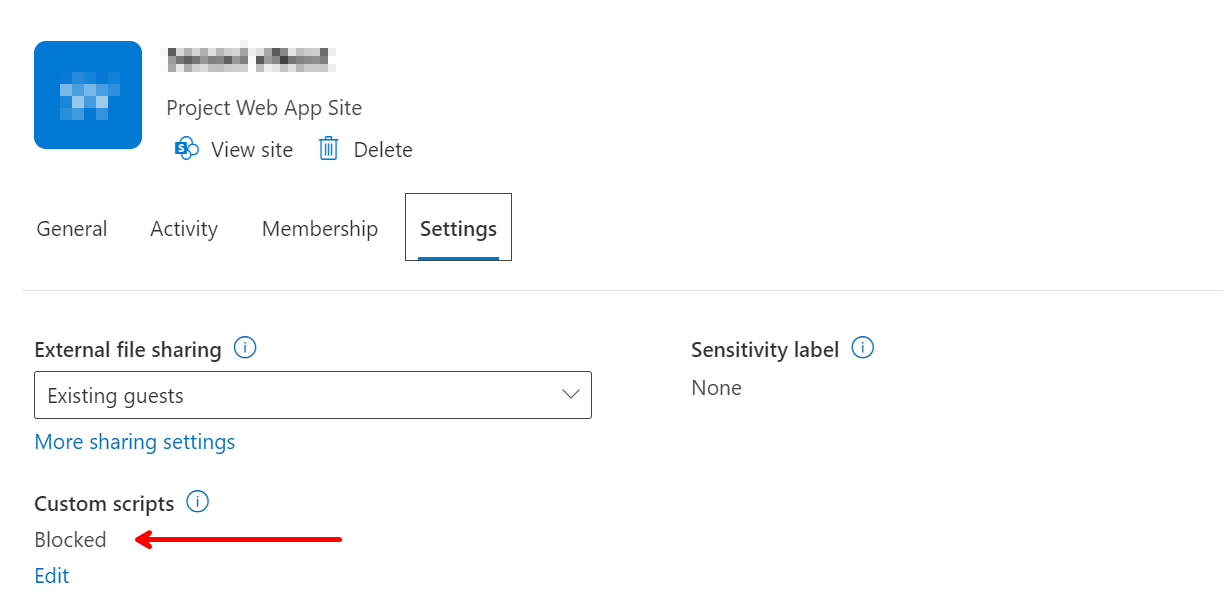
Changing this setting can alleviate problems with javascript based solutions such as PGI or Script Pack webparts, however Microsoft has announced they will be automatically changing the value of this setting back to disable scripts every 24 hours.
From Microsoft:
"Please be aware that the new PowerShell command will only be accessible until mid-November 2024 (previously May). Post that period, on SharePoint sites if administrators wish to continue using features that are only available when unmanaged custom scripts are permitted to run, they will need to re-enable the running of custom scripts every 24 hours."
As this functionality is required for the continued operation of production software, we have provided a Power Automate Flow that is capable returning this setting back to enabled state.
Please find the flow downloadable here.
This PowerAutomate flow requires a connection to be created prior to import:

This connection must
- Be using credentials that have access to the SharePoint Administrative portal
- Be set to target the SharePoint administrative portal which has a URL usually in the format https://tenantName-admin.sharepoint.com
After importing the Flow:
- Set the variable for the PWA URL target
- Test the Flow
- Replace the trigger with a schedule trigger to ensure this setting is correct as required.