Empower PPM™ - Technical Readiness
Please use the secure form Empower PPM Technical Readiness to report results back to Sensei.
This check-list should take between 30-60 minutes to complete. It is recommended that you ensure you have enough time to complete it before you begin.
Document Purpose
This document provides guidance to help prepare for the implementation of the Sensei Empower PPM Solution for Project Online.
This document is not intended to replace detailed documentation provided by Microsoft. See the Online References section for links to current and detailed documentation and configuration from Microsoft. Refer to the Empower PPM components overview for more information regarding the Sensei components deployed as part of Empower PPM.
Readiness Check-list
To ensure that you are ready to begin the configuration of your new Project Online environment, the following prerequisites should be completed before Sensei is scheduled to begin work.
1. Prepare O365 tenant
Empower PPM can be added to an existing O365 Tenant
- A domain should be chosen, and billing information completed.
- Configure any alternate domains to work with your tenant for Email, Teams or SharePoint services.
- If you plan on synchronising users from your on-premises domain it is best that this work is completed before implementation of Project Online. This is because later changes in domains or User Principal Names are not supported.
2. Administration Permission
- If you are creating a new tenant, the account that creates the environment is the first with the Global Administrator role. Record this identity in a safe place.
OR - If you have a pre-existing tenant please ensure you seek at least SharePoint administration permission before proceeding with the check-list.
3. Project Online Subscription
Project Online is a core component of Empower PPM. You can acquire your Project Online Subscription in multiple ways:
- You can acquire a Project Online Subscribtion from Sensei via our Cloud Service Provider facility. Contact your Sensei consultant if you would like to purchase Project Online through us. OR
- You can also purchase the subscription directly through the O365 Admin portal:
- Billing > Subscriptions > Add New > Project Online.
- You can start with a minimal number of licenses (minimum 1).
- This will create your Project Web App site by default at /sites/pwa
4. Create Sensei Accounts
Create the following Sensei accounts in the same Azure AD as the Project Online site collection (not Guest accounts):
- Reporting Hub Service account. Used to build a dedicated reporting database which is updated in real-time. See specific Reporting Hub Service account requirements.
- Sensei configuration and support account. This account will be used to perform the initial deployment and configuration of your environment. If subscribed to Customer Care, this account will subsequently be used to meet the SLA on support requests.
Note
Both accounts must be functional externally (from the Internet). The Reporting Hub Service, Initial Deployment, and subsequent support all require externally accessible account access.
5. Sensei Account Licensing
These two Sensei accounts must be licensed for:
- Project Online Professional (Plan 3 at minimum)
The Sensei Configuration and Support account must also be licensed for:
Exchange Online
PowerApps See Power Platform Licensing
- PowerApps Standalone if deploying the full suite of PowerApps OR
- PowerApps for Office 365 if deploying with minimal PowerApps
PowerApps for Office 365 is commonly provided by Microsoft 365 E1, E3 or E5 plans. Kiosk licenses (Microsoft O365 K1) are not suitable for the deployment account.
The full suite can be initially deployed using a PowerApps trial license if required. Licensing will either need to be implemented after 30 days for all PWA users including the Sensei account, or the apps will need to be removed from PWA views at the end of the trial.
Note
The Sensei configuration and support account should remain in place and active after implementation, in order to ensure power platform assets remain functional.
6. Licenses for additional users
Project Online
Please refer to the table diagrams below that summarise the Project Online licensing information from Microsoft for deciding how many licenses to purchase for the end-users.
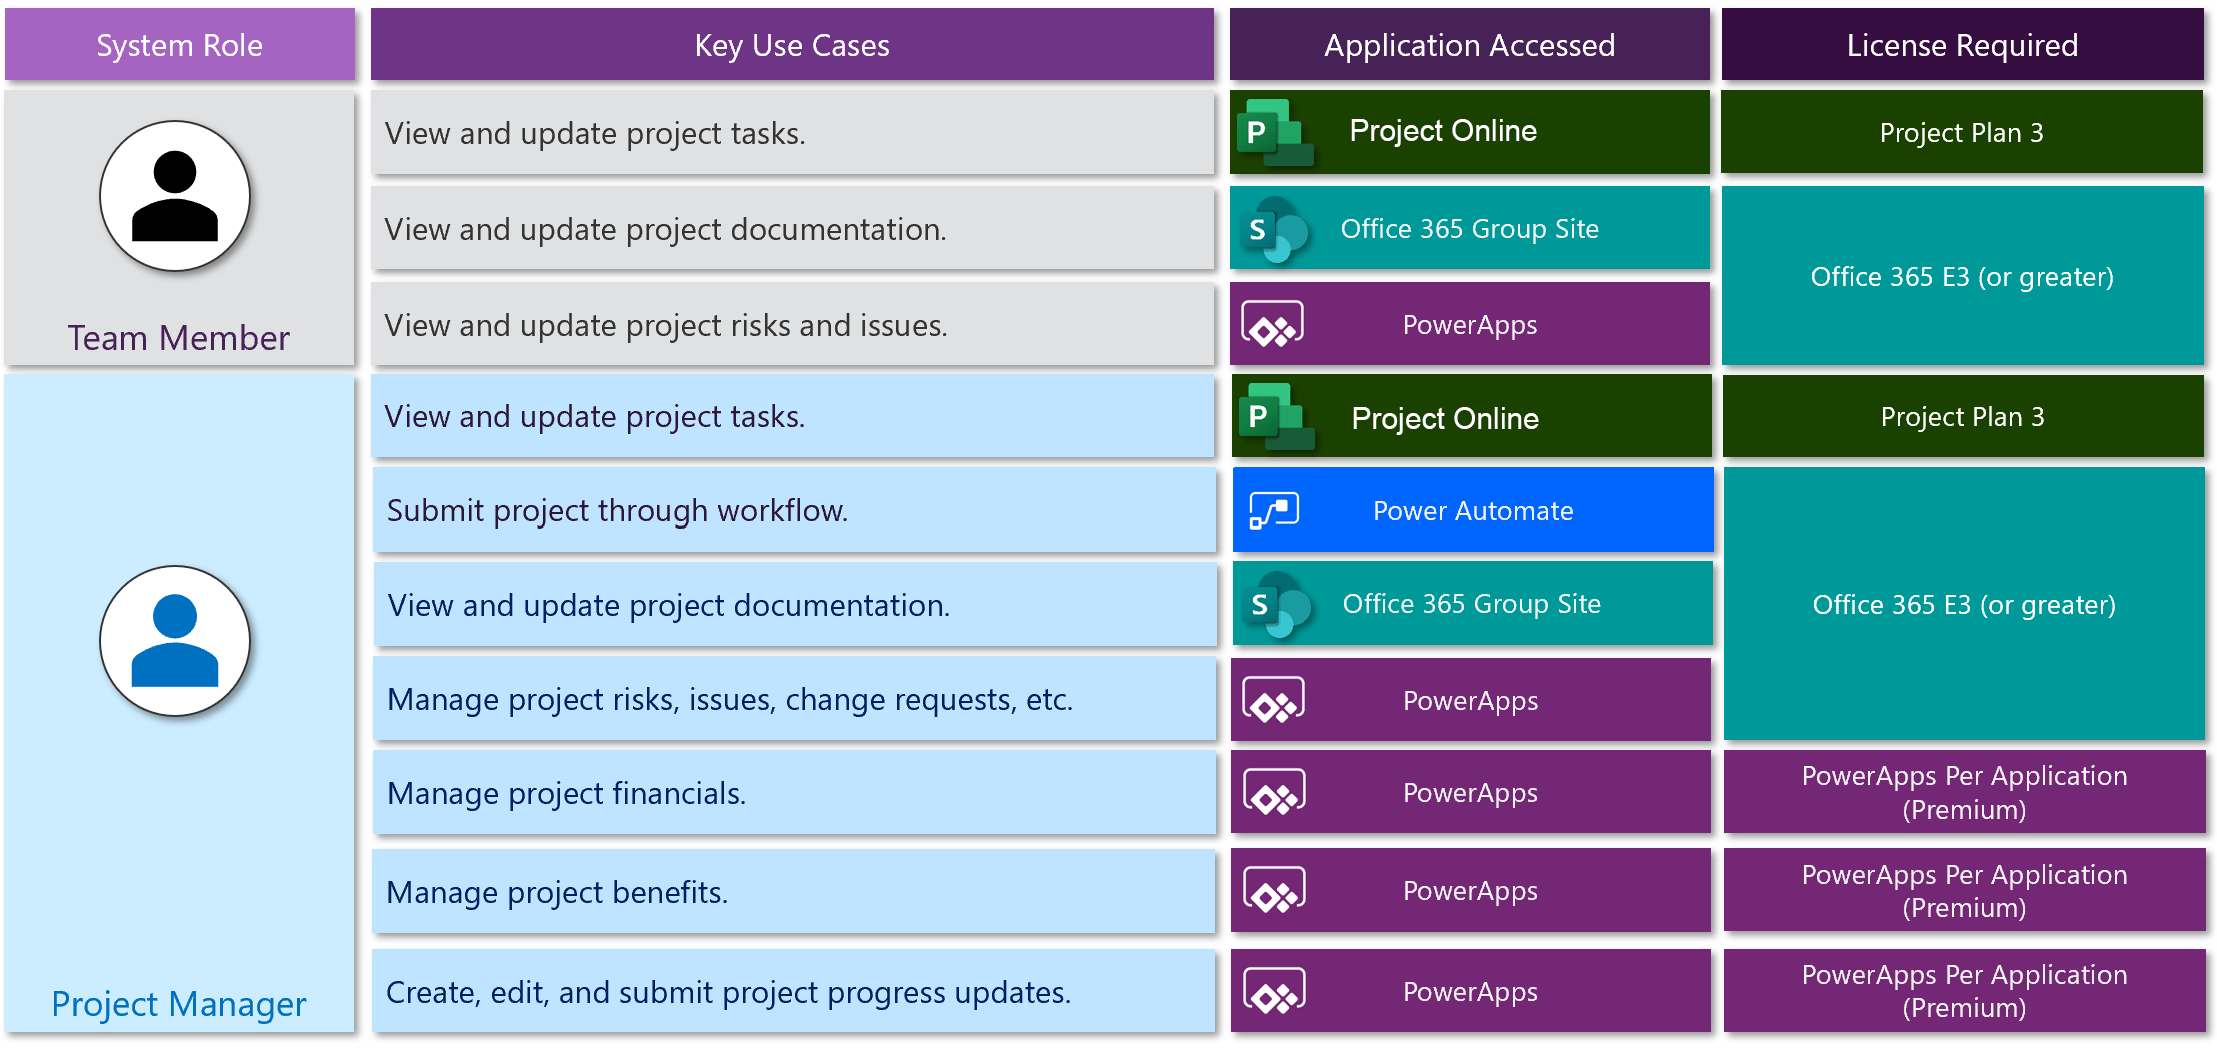
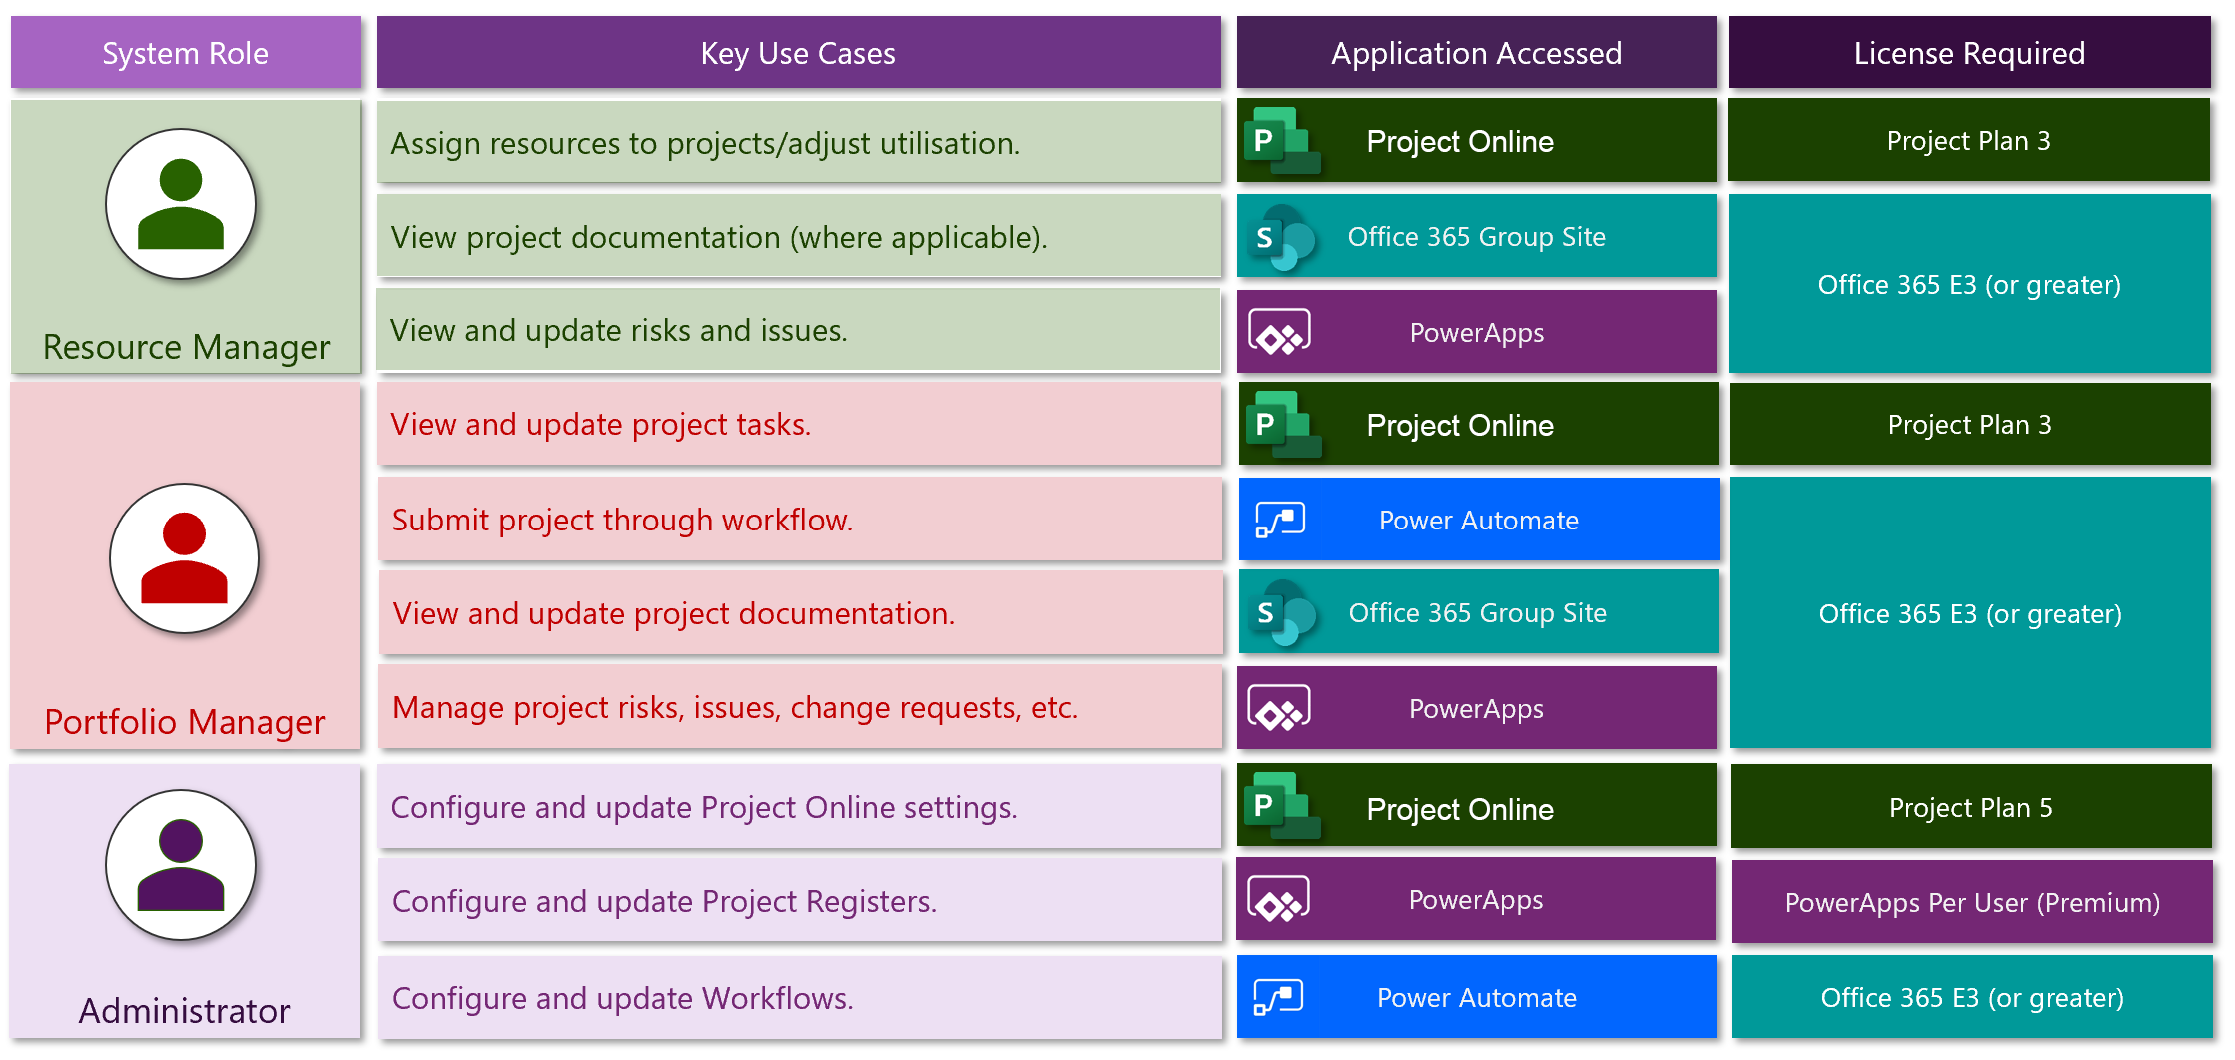
- Project Online Professional (Plan 3) should be adequate for most Project Managers and includes the Desktop Client.
- Project Online Essentials licenses to are good for Team Members (Resources) who do not require the Desktop Client. These liceses are an 'add-on' and so cannot be purchsed without first purchasing at least some seats of a higher license level.
- Project Online Premium (Plan 5) licenses are suited for Portfolio and Resource Managers.
PowerApps and Flow
- End Users require at least PowerApps for Office 365 & Flow for Office 365
- Post Oct 2019 End users require Standalone Power Apps license. See Power Platform Licensing
For customers with non-default PowerApps/Flow governance requirements see Power Platform Licensing for additional licensing requirements.
Note
Sensei provides indicative general licensing advice. Please consult your licensing adviser to confirm the specific licensing costs/requirements for your deployment.
7. Ensure that the Primary PWA instance is created
Check the SharePoint Admin Portal for a site collection that has Project Web App enabled existing at the default site collection of:
https://<yourorg>.sharepoint.com/sites/pwa
You can also use the 'Waffle button' -> Project -> Go to project Web App to verify the default PWA has been created.
8. Project Permission Mode
Empower PPM requires the more capable classic Project permission mode
Note
Before switching, ensure that the account performing the switch has at least the SharePoint Administrator Tenant role.
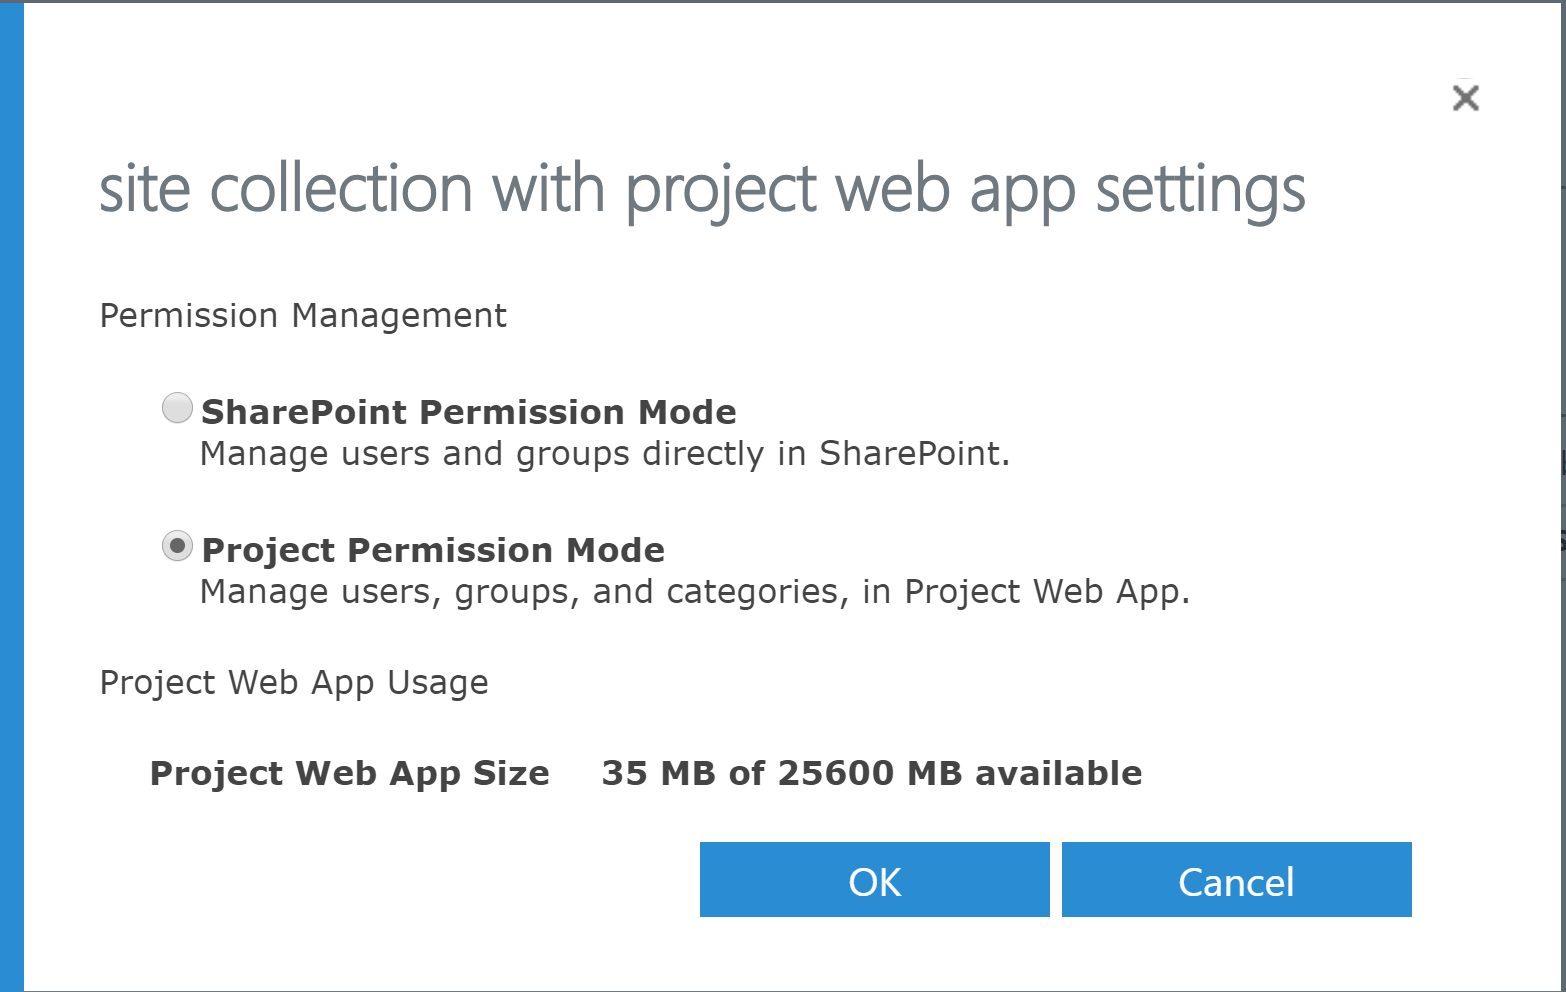
Set PWA permissions mode to Project Permission Mode See "Changing Permissions Mode" reference article in the Online References section.
In Summary:
- Go to the Office 365 admin center.
- On the left blade (menu), find Admin centers, expand the list, and select SharePoint. This will display a list of SharePoint site collections.
- Switch to classic mode
- Select the Project Web App site collection that you want to change.
- On the ribbon, find the Project Web App drop down icon, click the drop down button, and select Settings.
- Choose Project permission mode, and then click OK.
9. Project Online Administrators
Add Sensei Account to the Administrators Security group WITHIN Project Online
Navigate to your Project Online environment: use the "Projects" App launcher button
Click the settings cog icon in the upper right, then PWA settings.
Under Security, click Manage Users (If you do not see this, you have not yet switched permissions modes)
Click NEW USER:
- Under User logon account, add the Sensei account
- Scroll down to Security Groups and add 'Administrators'. You may remove 'Team Members'.
- Click Save.
10. Prepare for Reporting Hub Installation
Confirm that the Reporting Hub service account has been provisioned (as per step 5) according to requirements in Create Reporting Hub Service Account. This is required to allow for Reporting Hub to respond to events in your Project Online environment.
- License this account for: Project Online (Professional, or Premium)
Note
This account must remain in place and active during and after implementation, so that your reporting data can be synchronized to your Reporting Hub instance.
Verify your Azure AD is set to allow 3rd party applications (this is the default setting in Azure AD portal):
- Go to the Azure Active Directory Portal
- Click on User Settings and ensure the setting is at the default value as depicted:

Verify your SharePoint Online allows non-interactive 3rd party app authentication (this is the default setting)
- Navigate to O365 Admin -> SharePoint Admin Center
- Ensure the setting is at the default value as depicted:

If you are a Azure AD Premium subscriber it is also possible to block Legacy Authentication via "Baseline Security Policies". In this case, also ensure these polices are set to "Off", or create a custom policy where the account used/trusted locations are allowed to use Legacy Authentication.

It is an unfortunate requirement of the Microsoft Project Online service that requires Legacy Authentication for some operations.
11. Prepare for Application Loading
Option A (Recommended)
Create and Grant access to the Tenant App Catalog
- Verify the provisioning of an App Catalog site with your preferred naming conventions as per the first step of this Microsoft guidance.
- Navigate to the App Catalog site -> Site Settings -> Site Collection Administrators
- In the site collection administrator box please add the Sensei Service and the Sensei configuration accounts and press OK
Option B
Create a Site Collection specific App Catalog.
Note
You must be a SharePoint Tenant Admin to create a Site Collection specific App catalog.
- Perform steps in Option A to provision the Tenant level App Catalog if not already provisioned.
- Install SharePoint Online Management Shell on your PC with minimum version 16.0.7317.0 from here:
https://www.microsoft.com/en-us/download/details.aspx?id=35588 - Open PowerShell and issue these commands (substitute the "contoso" URLs with your domain and appropriate PWA url):
Connect-SPOService -Url https://contoso-admin.sharepoint.com
Add-SPOSiteCollectionAppCatalog -Site (Get-SPOSite <https://contoso.sharepoint.com/sites/pwa>)
12. Site Collection Administrators
The Sensei Accounts must be in the Site Collection Administrators group for the Project Web App site collection
- Office 365 Portal Admin > Admin > SharePoint
- Highlight the Project Web App site collection and choose Owners > Manage Administrators from the ribbon
- Add all Sensei Accounts into the 'Site Collection Administrator' box.
13. O365 Groups for Workflow Approvals
The workflows included with Empower PPM use O365 Groups to identify the Approvers required at each Stage Gate. The names for these Groups can be modified to your requirements, but any variation of name must be communicated back to Sensei prior to deployment of Empower PPM.
See Reporting Completion to Sensei for instructions on how to communicate this to Sensei.
Groups can be consolidated to a smaller number of groups if the same Group of individuals will be responsible for approving more than one Stage Gate.
Recommended Groups: | Group Name | | -------------- | | Department Approvers | | Steering Committee Reviewers | | Baseline Schedule Reviewers | | Project Closure Reviewers |
For each of the groups above perform the following:
- From the Microsoft 365 Admin Center select Groups from the left menu.

- Select Add a group.

- Ensure that Office 365 is selected as the Type. Enter the Name of your group (e.g. Department Approvers). Enter the name of the group without spaces in the Group email address column. Set Privacy to Private. Select an Owner for the Group, then press Add.
Important
Ensure that the account assigned to Sensei for configuration is also assigned as an Owner of this Group (in addition to any other required Owners)

- Once the Group is created, select Close.

- Next, select your newly created Group from the list of all Groups.

- Select to Edit the Members of the Group.

- Select Add members.

- Use the interface to select the appropriate members for your Group, then select Save

- After adding Members, select Close

- Repeat these steps until all of the required O365 Groups have been created.
14. Power Platform target environment
PowerApps and Flows reside within a Power Platform environment. Each tenant has a default environment which can be used for Empower PPM deployment without issue, however it is best practice to utilise a dedicated PowerApps Environment.
The new PowerApps Environemnt must be created with the following settings:
- The Sensei deployment account must be granted the 'Environment Admin'.
- The Environment must created with the CDS database option enabled.
Note
Users or security groups can be assigned to either of these two roles by an Environment Admin from the Power Platform Admin center or Power Apps Admin center. More information on Environments here.
15. Exchange Online
An Exchange Online mailbox is required workflow and approval notifications.
While Flows and PowerApps don't have any direct dependence on Exchange, emails are sent to notify users of an incoming approval request or decision.
Please ensure all users participating have Exchange Online homed mailboxes (rather than on-premises mailboxes)
Reporting completion to Sensei
Please use the secure form Empower PPM Technical Readiness for reporting results back to Sensei.
Hardware & Software Requirements Overview
At a high-level, the key requirements for Microsoft Project Online are:
Creation of a new Office 365 tenant to support the subscription(s) OR
Utilization of an existing Office 365 tenant to support the subscription(s).
Subscription to Project Online Professional (Plan 3) for all Project Managers that require the ability to open and edit projects in the client scheduling application OR Subscription to Project Online Professional AND licenses for Project Professional 2019 for all Project Managers that require the ability to open and edit projects in the client scheduling application. Note: The 2019 version of Project Pro is required to use the Sensei Portfolio Analyzer add-on or to use the Resource Plans view for Resource Engagements.
Subscription to Project Online Premium (Plan 5) for all Executives, Resource Managers, Application Administrators and other Key Stakeholders that are expected to manage Portfolio Selection and Optimization, Demand Management, Enterprise Resource Management, Office 365 Project Portfolio Dashboard users.
Subscription to Project Online Essentials for all Team Members (Resources) that are expected to work with Project Artefacts, provide progress updates to Project Managers and/or complete Timesheets.
A Supported Web Browser is required. Supported browsers are: the most current versions of Edge, Chrome, or Safari; and the most current version of Internet Explorer until August 17th 2021.
Internet Explorer Considerations
Note
Microsoft has provided guidance that Internet Explorer 11 is a supported browser for use with Microsoft Office 365 until August 17th 2021.
Warning
Teams Integrated features such as PGI (Project Group Integration) are unsupported with IE 11.
In order for IE 11 to be used with Power Apps, Internet Explorer Zones configuration needs to be considered.
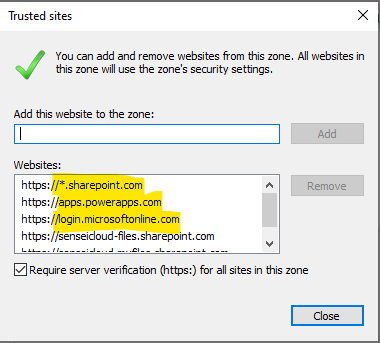
The following sites must all evaluate be in the same Internet Explorer Zone:
- https://*.sharepoint.com
- https://apps.powerapps.com
- https://login.microsoftonline.com
This could be achieved in a number of ways:
- Putting all the above sites into Trusted Sites Zone
 OR
OR - Ensuring none of the above sites are in the Trusted Sites Zone
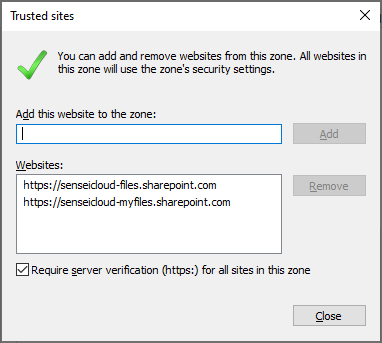
The goal is that after the Zone rules have been applied, that all the sites reside in the same Internet Explorer Zone.
Software Updates
Microsoft will deploy the latest updates and service packs to your online environment, however if you utilize "standalone licenses" for Project Professional 2016, it is also best practice to have Project Professional at the same service pack and cumulative update level as the server(s) if possible. This means that when updates are released, they should be applied to the client.
Minimum Software & Hardware Requirements
Internet Access Requirement
This is a Software as a Service product delivered from our presence on the Internet.
It is assumed that end-users will have access to the Internet for the service to function, including (but not limited to) our domains:
- *.sensei.cloud
- *.projectserver.com.au
Client Hardware Requirements
| Component | Minimum Requirement |
|---|---|
| Processor | No Requirement |
| RAM | Recommended 4GB |
| Hard Disk | Recommended at least 50 GB.The OS for your client machine will consume a significant portion of your hard disk available space, and to allow for syncing SharePoint online libraries, day-to-day Office work and downloading the Office applications, we recommend the above. |
| Other | DVD drive or other access to applicable software from Office 365 tenant. |
Application and License Requirements
Note
Sensei provides indicative general licensing advice. Please consult your licensing adviser to confirm the specific licensing costs/requirements for your deployment.
| Application | Role | Minimum Requirement |
|---|---|---|
| Office (Outlook, Word, Excel, PowerPoint, Skype) | All | One of the following: Office 2019 "Standalone", Office 365 (client applications downloaded from tenant) |
| Project | Project Administrator, Executives, Resource Managers, Portfolio/Program Managers | Project Online Premium (Plan 5) License, Project Professional (Office 365 download from tenant OR Project Pro 2016) |
| Project Managers | Project Online Professional (Plan 3) License, Project Professional for Office 365 OR Project Professional 2019, PowerApps See Power Platform Licensing | |
| Team Members | Project Online Essentials | |
| Power Platform (PowerApps, Flow) | Project Administrator, Executives, Resource Managers, Portfolio/Program Managers | See Power Platform Licensing |
| Project Managers | See Power Platform Licensing | |
| Team Members | See Power Platform Licensing | |
| Administration | PPM Administrator | PowerApps & Flow See Power Platform Licensing, Azure Storage Explorer (only if custom integrations have been implemented) (Download: https://azure.microsoft.com/en-au/features/storage-explorer/), SQL Server Management Studio (Download: https://docs.microsoft.com/en-us/sql/ssms/download-sql-server-management-studio-ssms?view=sql-server-2017) OR Azure Data Studio (Download: https://docs.microsoft.com/en-us/sql/azure-data-studio/download?view=sql-server-2017) |
| Report Development | Report Builders | SQL Report Builder 3 (https://www.microsoft.com/en-us/download/details.aspx?id=53613), Power BI Desktop (for Power BI enabled tenants) (Download from Microsoft Store), SQL Server Management Studio (Download: https://docs.microsoft.com/en-us/sql/ssms/download-sql-server-management-studio-ssms?view=sql-server-2017) |
| Browser | All | Latest Explorer, Edge, Chrome, Safari, and/or Firefox for working within your tenant and testing various browser rendering. See reference article above "Plan Browser Support and Minimum System Requirements". |
Service Account
To respond to events in your Project Online Installation Sensei Reporting Hub will utilise a service account (set of credentials). This service account has the following requirements:
Must have at least a Project Online Professional license.
Must have appropriate SharePoint Permissions. Since Reporting Hub also attempts to aggregate SharePoint list information -- it is important that the Reporting Hub service account is granted appropriate access to read all the required SharePoint items. If you want all your SharePoint list items to be reportable, grant the Reporting Hub Account Site Collection Administrator rights.
Must have at least "Portfolio Viewer" Project Online permissions -- this grants the service account access to the ODATA Feeds ("Reporting" permission). PWA Administrator is also acceptable.
Create the Reporting Hub Service Account. Go to the Administration portal for your tenant

Under Users->Active Users, press the plus button and fill out the account details.


Ensure you ensure that the account is allocated at least a Project Online Professional license.Set the account to have a non-expiring password. This step can be accomplished via the O365 Administrative portal or by PowerShell
- O365 Admin Portal
- PowerShell
- After having installed the The Microsoft
Azure Active Directory Module for Windows PowerShell
cmdlets
open a PowerShell window and execute the Connect-MSOLService
commandlet. Log in with a tenant administrator account.

- Issue the command:

- After having installed the The Microsoft
Azure Active Directory Module for Windows PowerShell
cmdlets
open a PowerShell window and execute the Connect-MSOLService
commandlet. Log in with a tenant administrator account.
Set-MsolUser -UserPrincipalName <serviceaccount@contoso.com> -PasswordNeverExpires $true
Legacy Authentication Considerations
The authentication mechanisms utilised by the Reporting Hub and Integration Hub are a function of the Microsoft API's. The Reporting Hub and Integration Hub are non-interactive services so they must authenticate without a user being present. The service account utilised for this process authenticates non-interactively via Legacy Authentication.
We realise this is not ideal however there are some additional points of note for Legacy Authentication
- Legacy Authentication is encrypted and secure. The communications channel utilised when sending username and password to Azure AD are protected by the latest TLS encryption, identical to online banking.
- Legacy Authentication is still a standard supported feature on all Microsoft O365 tenants.
- Legacy Authentication is the only method made available by Microsoft to authenticate non-interactively with the Project Online PSI interface. Microsoft doesn't support modern authentication of Service Principals to this interface (App Only tokens), and all access must be tied back to a licensed user of Project Online.
- Adding the Sensei Reporting Hub or Integration Hub to an Office 365 installation doesn't add any endpoints to that installation or alter the security posture of an O365 tenant.
- The Reporting Hub can be set to utilise App+User tokens, aka low-trust ACS mode (which we also call SharePoint App mode) but it is not fully functional, is reliant on refresh tokens that can expire therefore we cannot provide service SLAs in this mode. Additionally since the Integration Hub utilises the PSI (see below) it is not available in SharePoint App authentication mode (App + User token).
- Maximum conservative security posture while maintaining full functionality is achieved by implementing Azure AD conditional access to limit the source locations from which legacy authentication is available. See below for Azure AD Conditional Access considerations.
Authentication to APIs in Project Online
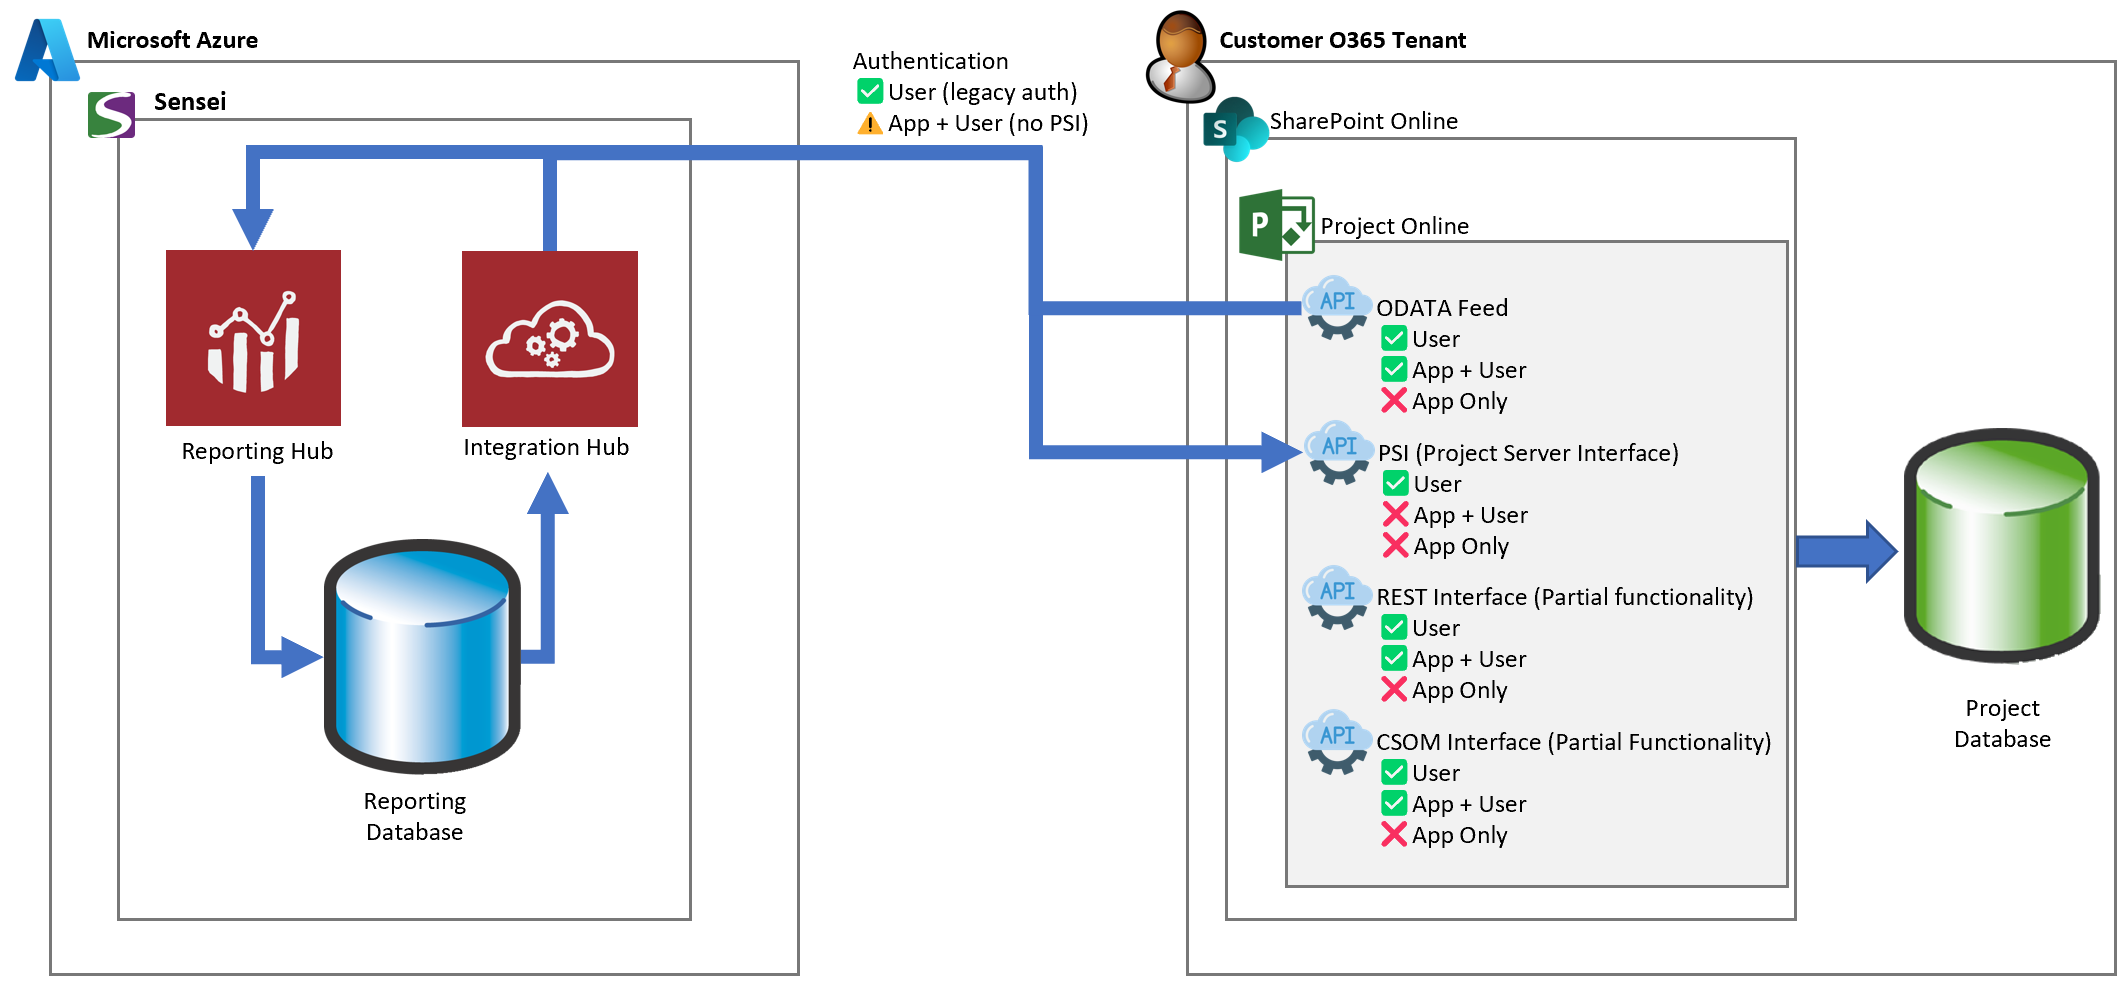
- ODATA Feed: Found at <PWA URL>/_api/ProjectData the Project ODATA feed can be accessed by a user token acquired via legacy authentication or a modern App + User token. Cannot be accessed via App-Only tokens.
- PSI (Project Server Interface): Found at <PWA URL>/_vti_bin/psi The PSI can be accessed only via user token. The only way to acquire a user token non-interactively is via legacy authentication.
- REST Interface: Found at <PWA URL>/_api/ProjectServer The REST interface for Project Online contains some basic functionality for performing basic operations and supports User and and App+User tokens
- CSOM Interface: Utilised via client side libraries, this interface is commonly used with user tokens but can be used with App+User tokens in SharePoint Provider Hosted app scenarios. The functionality provided by this interface is incomplete.
Multi-Factor Authentication Considerations
When enabling Multi-Factor Authentication (MFA) for the account used as the Reporting Hub service account, the credentials supplied must instead be an "App Password" created for the Reporting Hub Service account.
Once you have created the Reporting Hub service account as per the instructions above:
Log into SharePoint Online using the Reporting Hub service account, supplying the username, password and code as required by MFA.
Go to Office 365 Settings
Go to Additional security verification
Click on Update your phone numbers used for account security.
Choose "app passwords" in the header menu
Then click create. This will issue the password for use with Reporting Hub.

Azure AD Conditional Access Considerations
Azure AD Conditional Access is an advanced security measure designed to limit the exposure of a directory from attack. We fully support this effort however our services must be white-listed in order to provide the necessary functionality.
The following IP Addresses range must be added to the Azure AD conditional access white-list:
All customers:
- 20.190.127.130
- 20.190.127.131
- 20.190.127.152
- 20.70.80.31
- 20.70.81.217
- 20.70.82.111
- 20.70.84.161
- 20.70.86.193
- 20.70.86.214
- 23.101.224.24
- 23.101.224.25
- 23.101.224.26
- 23.101.224.27
- 23.101.224.28
- 4.198.156.120
- 4.198.156.246
- 4.198.157.137
- 4.198.157.250
- 4.198.159.59
- 4.198.159.63
- 40.127.74.210
- 52.147.32.134
Additional IP addresses for customers in particular categories:
Australian BYOD Customers:
- 52.255.42.4
Australian Enterprise/Premium Level Customers:
- 13.70.147.206
- 52.255.48.136
- 52.255.52.247
- 52.255.52.88
- 52.255.54.129
- 52.255.58.179
- 52.255.59.119
United States - All Customers:
- 23.101.194.183
- 23.101.205.197
- 23.101.206.54
- 23.101.206.60
United States - BYOD customers
40.125.70.84(Removed on 16 December 2020)- 168.62.213.203
Europe - All customers:
- 104.40.212.192
- 104.46.52.221
- 104.46.52.73
- 104.46.59.103
- 13.80.2.124
- 13.80.3.14
- 13.80.3.22
- 13.94.233.107
- 191.233.87.194
- 20.76.129.180
- 20.76.129.45
- 20.76.131.133
- 20.76.131.150
- 20.76.131.152
- 20.76.131.193
- 98.64.25.117
- 98.64.25.118
- 98.64.25.121
- 98.64.25.122
- 98.64.25.125
- 98.64.25.166
Europe BYOD customers:
- 13.93.127.130
Power Platform Licensing
Note
On 29th August 2019, Microsoft announced new licensing changes to come into effect from 1st October 2019. The changes affect the way Power Apps and Flow are licensed in the customer environment.
The detail of changes is here:
Most of the Sensei Empower PPM PowerApps and all of the Flows fall within the Seeded license that comes with Office 365 E-Series plans (E1, E3, E5), however several of the PowerApps use the SQL Database connector which requires a Standalone PowerApps license:
Empower PPM Includes the following Power Apps
| Power App | Licence Requirement | Description |
|---|---|---|
| Risks | Seeded | Risk Register |
| Issues | Seeded | Issues Register |
| Change Requests | Seeded | Change Requests Register |
| Deliverables | Seeded | Deliverables management |
| Ideas | Seeded | Ideation Management |
| Lessons Learned | Seeded | Lessons Learned register |
| Team Member | Seeded | Team member focused application that allows quick updating of multiple registers |
| Workflow Major | Seeded | Workflow display and stage advancement |
| Workflow Minor | Seeded | Workflow display and stage advancement |
| Workflow Administration | Standalone | Administrative Skip-to-stage functions for advancing or resetting project workflows |
| Financials | Standalone | Financial Budget and Cost tracking |
| Benefits | Standalone | Benefit Realisation tracking |
| Project Progress | Standalone | Display and management of project progress integrated with Financial data |
The usage rights for the Apps marked as Standalone above above can be licensed from Microsoft by:
- PowerApps Per User per App Plan (Per User App Passes) OR
- (Recommended) PowerApps Per User Plan (Unlimited Apps)
Note
Sensei provides indicative general licensing advice. Please consult your licensing adviser to confirm the specific licensing costs/requirements for your deployment.
Governance
Unless otherwise instructed Sensei will deploy PowerApps and Flows into the Default PowerApps environment.
For customers with additional governance requirements, or Data Policy implementations - it may be desirable for Sensei to install the PowerApps and Flows into a non-default Production PowerApps environment. Although not required, Sensei encourages prudent levels of governance around the use of PowerApps and Flow. Customers are encouraged to review the Microsoft PowerApps and Microsoft Flow Governance and Deployment Whitepaper
In order to facilitate higher levels of governance, deployment will need to be targeted at a non-default Production environment. The Sensei deployment account (and optionally any other customer administrators) will need a license that allows the creation of a non-default Production PowerApps Environment and subsequent deployment into that environment. At this time the minimum level of licensing that provides this functionality is:
- PowerApps Plan 2 licence. Each Power Apps Plan 2 licensed user can create a non-default Production environment. If capacity-based licensing is in doubt, choose this one.
OR - (Post Oct 2019 to be confirmed) PowerApps per user License.
If using a non-default Production PowerApps environment, it must be created with a CDS database (dependency on Approvals) and the following connections allowed via Data Policy Administration:

Please work with your Sensei Technical lead to ensure that requirements are met with regard to the PowerApps environment before deployment begins.
Assessing Current Licenses
For reference and planning PowerApps/Flow licensing, a list of all users assigned a license can be generated via the PowerApps Admin Center.
Navigate to the PowerApps Admin Center
Under Tenant > User licenses, select "Download a list of active user licenses"
A CSV file will be returned listing all consumed licenses.
Dataverse capacity management
Since Altus requires a Dataverse Power Platform environment - this will consume at least 1 GB of Dataverse quota. This section details how to monitor and resolve Dataverse quota problems.
In April 2019 Microsoft introduced a new capacity-based model for tracking power platform storage and database usage. In this new storage model, environment creation rights are governed by the amount of available database capacity instead of being based on user license entitlement.
Within this new capacity model, the following points are important to understand:
Important
- A new environment may not be created without a minimum of 1 GB database capacity available.
- Some administrative actions for environments are disabled while the organization is in capacity deficit.
- Capacity deficit will need to be resolved at time of license renewal.
Check capacity usage
Organization capacity usage can be observed in the Power Platform Admin Center > Resources > Capacity.
You should be presented with a breakdown of capacity usage similar to the following image:
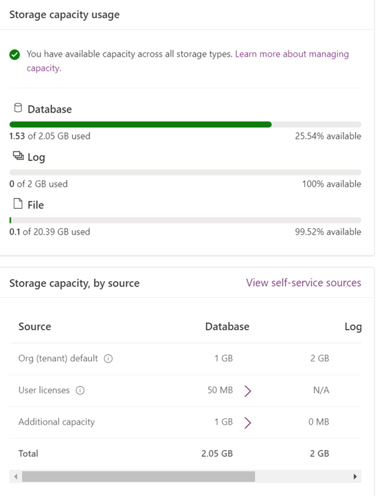
If your capacity portal does not appear this way, your organization may be operating under the legacy storage model. Run through the process found at the following link to confirm: Legacy storage capacity - Power Platform | Microsoft Docs
Please notify your implementation contact if this is the case, as there may be deployment implications.
Addressing a capacity deficit
Many products are recommended to be deployed to a new environment. If the available capacity is less than the 1 GB required for new environment creation, one or multiple of the following options will need to be investigated.
1. Delete unused / unnecessary environments
If any existing environments can be deemed unnecessary or unused, you may wish to delete them. This will immediately return at least 1 GB of database capacity per deletion excluding size of environment content.
2. Free up storage space
Please visit the following page for a list of common procedures that may be followed to reclaim storage from existing environments and solutions: Free up storage space - Power Platform | Microsoft Docs
3. User licensing
Capacity may be sourced via the purchase of user licenses. See the Power Apps and Power Automate Licensing Guide for purchasing information.
Note
Per app plans currently do not provide any additional capacity as detailed in the licensing guide. This is expected to change, however no ETA is known at this stage. Per user licensing provides 400 MB database capacity per license as expected.
4. Purchase a capacity add-on
Capacity add-ons may be sourced via purchase of add-on capacity in 1 GB increments. See the Power Apps and Power Automate Licensing Guide for purchasing information.
More information on these add-ons can be found here: Capacity add-ons - Power Platform | Microsoft Docs
Empower PPM Components
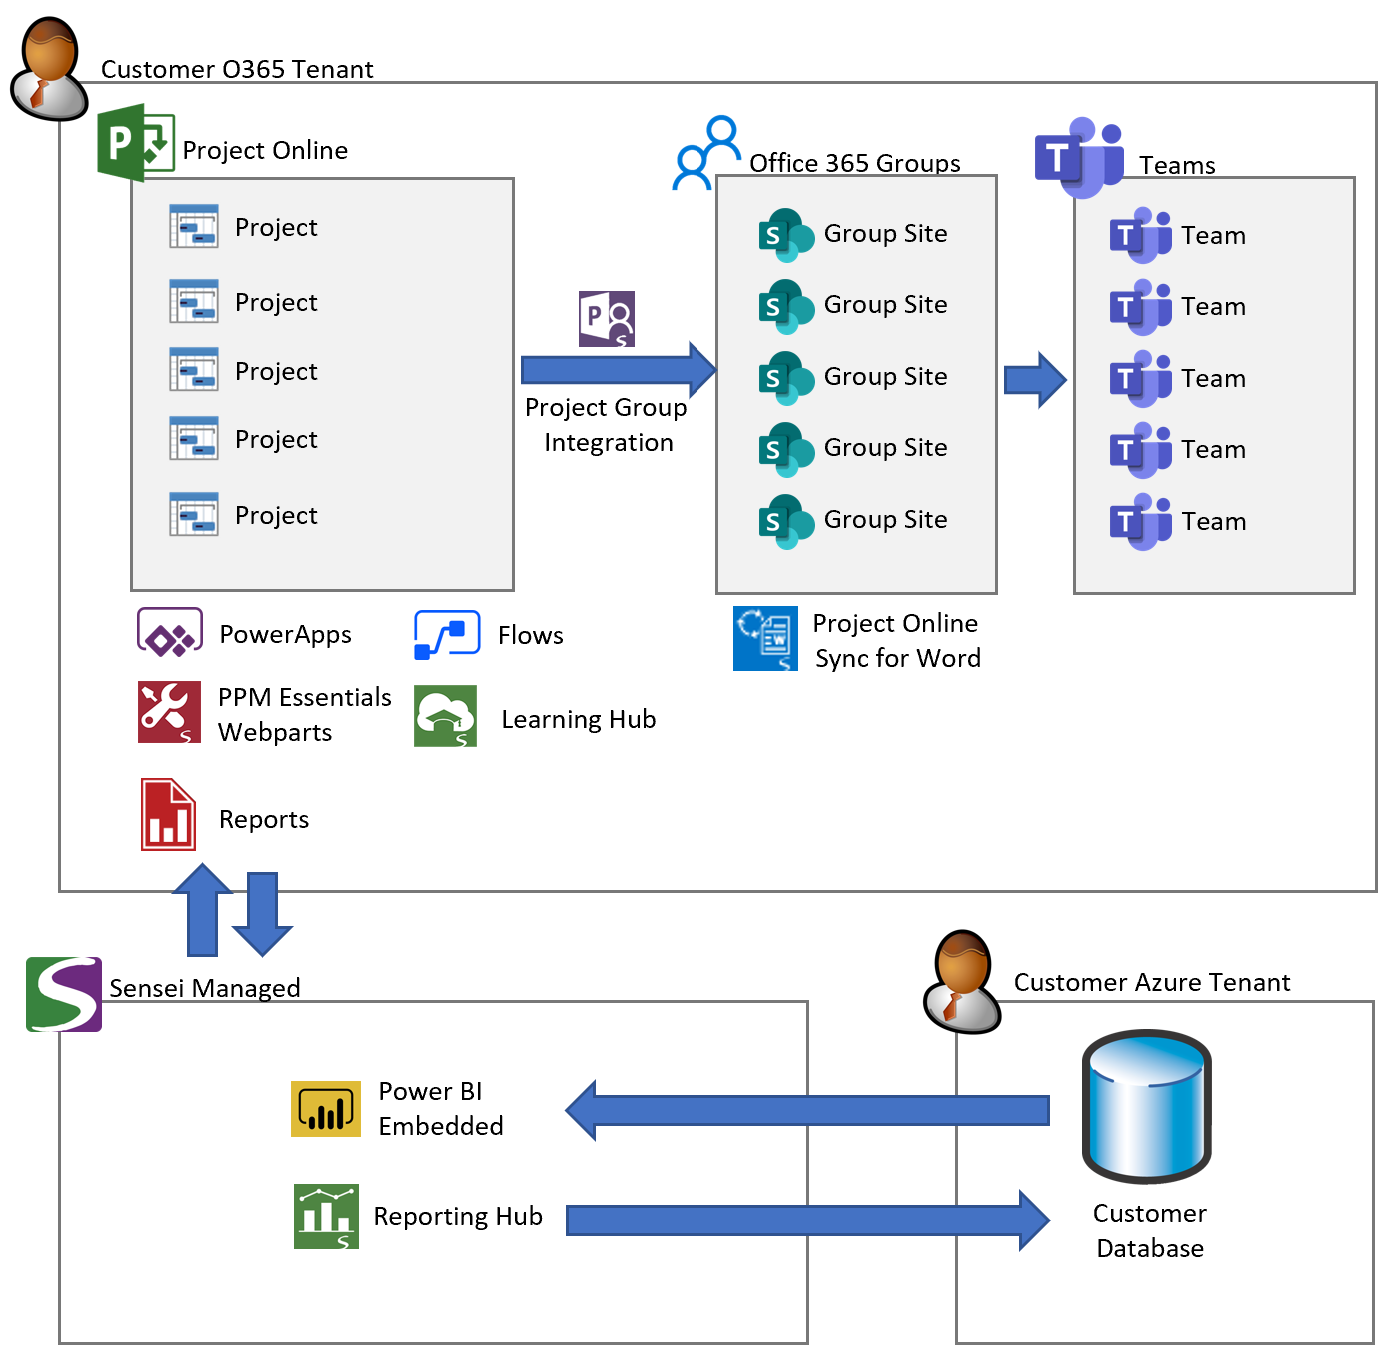
Empower PPM is an evolution of Project Online deployment to leverage advances in the Online Services available to most existing Office 365 subscribers.
Complimentary Sensei components are deployed with Project Online inside Office 365 to enhance the functionality available and promote best practices.

Additional Sensei Components include:
- Project Online Configuration Empower PPM best practice Project Online configuration is pre-loaded.
- Project Groups Integration is used to provision O365 Groups and Teams.
- Power Apps and Flows Various PowerApps for project related information are deployed into the customer environment to allow an intuitive user experience when managing and updating Project related information, workflows and financials.
- PPM Essentials is a suite of webparts to improve user experience inside Project Online.
- Learning Hub enables users to quickly learn about Microsoft Project and Project Online features, functions and best practices. It is available directly inside Project Web App from the Knowledge Center.
- Reports are provided by the Reporting Hub and Embedded Power BI Modules.
- Project Online Sync for Word is utilised in the O365 Group Sites for acquiring and synchronising Project related information into Word documents.
BYOD
Empower is also available in Bring Your Own Database configuration, for customers with high regulatory requirements for data sovereignty. It is typically not recommended because it is more expensive to run and relies on the customer to actively manage the database.
See Reporting Hub BYOD Preparation for deployment requirements.
Online References
This section contains links to on-line references with current and detailed information about the Microsoft Project Online platform.